Platform: rules and guidelines
Platform is a major P2P processing solution connecting traders with clients and providing the incoming and outgoing cash transfers. Main areas include but are not limited to licensed gambling and betting. No "dark" topics or scams.
Where to start?
Here is a list of basic steps you as a partner need to take when integrating.
1️⃣ Read Platform Rules.
2️⃣ Send us a questionnaire with a request for access.
3️⃣ Read General Instructions and use them to set up your personal account and the automation apps. For the latest version of the app, visit the Main chat.
4️⃣ Read the SLA (Service Level Agreement) and How to reduce the number of appeals.
5️⃣ Make a test payment check that the automatic matching is set up correctly. In other words, make sure that the app reads SMS or push notifications and shows them in the SmsHub section, and that the requests are matched automatically.
6️⃣ Top up your balance and switch to the online mode to receive the production traffic.
7️⃣ Notify the Main chat that you are ready for launch and wait to be connected to production traffic. The first usable (test) integration is prearranged with the technical support team and carried out during working hours from 9:00 to 18:00. Before the operation start, the operator must do the following: check their computer, smart phone, the app behavior and Internet access reliability, turn on the VPN connection, and make sure that the phone receives SMS messages. Before launching the traffic, restart the app, and go online by clicking I'm online.
8️⃣ If necessary, after the successful launch, you can ask your key account manager to enable the payout option for you.
Activating the payout option
To enable payouts, you need to undergo the KYC procedure. For more information, reach out to your key account manager.
Access granting procedure
Attention!
Once you get the access credentials, you have to authorize within 24 hours, otherwise your access will be cancelled!
Fill in the questionnaire:
| FIELD | DESCRIPTION |
|---|---|
| Partner's Email | enter your email |
| Super-operator's Email | enter the superoperator email |
| Operator's Email | enter the operator email |
| Balance currency (USDT or local currency ) | enter the currency |
| Rate source | Bybit |
| Traffic direction | enter the direction, for example account or cards Find out more about all available traffic directions from your key account manager. |
| Number of requests per account | enter the number of requests |
Platform rules
Responsible persons on the trading team side
Partner—a contact person on the traders' side, arranging organizational issues with the key account manager. Partner overlooks the balance, statistics of accounts, operators, sets up teams of operators lead by super-operators. Tops the balance up, negotiates operation terms.
Super-operator—a team lead responsible for managing the operators. Responsible for setting up accounts. Superoperator can be an individual employee processing traffic.
Operator—an employee in direct control of the accounts which is responsible to keep their device and the key apps running. Resolves any disputed incoming payments directly with the platform's technical support team. This position might not be used if the super-operator covers all operator's functions.
Operator duties:
- Interacting with the platform's technical support team.
- Correct and timely processing of request statuses, prompt resolution of incoming appeals.
- Maintaining their tools in working order. Notifying the platform's technical support team in case any malfunctions are detected.
Liability of the Parties
If a request is assigned an incorrect status, resulting in financial losses due to incorrect functioning of the app, automatic matching, the platform's technical support team, we will notify you in the work chat and accept responsibility for it.
Partner accepts the full financial responsibility for the work of the teams that operate under Partner's supervision.
Selling access to the platform is strictly prohibited!
If a token sale is detected, the team lead and all the teams brought over by the team lead are disabled without the possibility of recovery.
Chats required for work
We use three chats for work:
🔴 Main—the chat is intended for communicating with key account managers and tech specialists. Use this chat to submit your requests for access credentials, to coordinate working conditions and traffic volume issues, to send the feedback about the platform's operation, as well as your improvement suggestions.
🟡 Support—tech support chat to discuss technical issues, appeals handling, and other work-related non-financial issues.
🔵 Finance—chat with the finance team. This chat is intended for such matters as balance crediting, balance distribution, reconciliations, commission, credit rates, and other financial issues. (Currently, the transition to independent crediting through the platform is underway.)
💰 The platform offers a team referral program. For more information about integrating new teams and referral rates, reach out to your key account manager on the Main.
Requirements for the number of accounts and finances
- Minimum of 5 personal accounts + reserve Teams with the number of accounts less than 5 might only be allowed to work under a currently active partner. In other words, such teams join one of the currently active partners as an operator or a super-operator, provided the partner agree to accept these teams.
-
Working deposit (not to be confused with security deposit)—over 2000 USDT. The working deposit is used for traffic. Although, you can use for traffic only the part of the working deposit that exceeds the security deposit.
-
Security deposit—the security deposit is included in the balance, but not used for traffic. The size of security deposit is agreed upon with your account manager.
What are working deposit and security deposit?
Working deposit—total amount of funds deposited. The working deposit is used for traffic. Although, you can use for traffic only the part of the working deposit that exceeds the security deposit.
Security deposit* is the minimally allowed amount on a working deposit; in other words, this is the minimum required balance that should always be on a working deposit.
Here is an example:
Working deposit: 5000 USDT
Security deposit: 1000 USDT
Amount on the working deposit available for traffic: 4000 USDT (5000 USDT - 1000 USDT)
Operation policy
- Response to tech support requests and chats: 24 hours a day, 7 days a week.
- Device operation: 24/7 and uninterrupted Internet access.
Service Level Agreement (SLA)
-
Appeal reaction time: under 90 min.
If there's no reaction to an appeal in 90 minutes, the appeal may be automatically resolved in favor of the customer. -
Average appeal percentage: under 0.5%.
-
If an operator generates a large percentage of appeals (for example because smart phone was inactive or out of the network coverage or the operator didn't promptly disable a blocked account), the team is disconnected from traffic for 24 hours or more at the sole discretion of the platform administration.
-
The deadline within which the trader is obliged to react to the appeal status: 30 days since the request was created. Decisions on appeals submitted later than 30 days since the request was created are discussed and finalized separately.
-
If the amount received was correct but the automatic matching did not close the payment, the operator must immediately, within 15 minutes, manually change the payment status to success before the customer creates an appeal. The operator can change the request status to success within 15 minutes from the moment the request is created, provided the request is still in the awaiting status.
-
If the customer sends an amount that is different from the request amount, the operator is required to find the correct request, match the data to SMS and link SMS to the correct request.
-
Requests in the In Work tab cannot be kept longer than 30 minutes!
-
If the amount received differs from the request amount and the operator cannot find the corresponding request, the issue must be reported to the Support chat by algorithm .
The rules knowledge is mandatory!
All teams using Platform must read and agree to comply with the rules laid out in this agreement.
How to reconcile accounts and link SMS to requests?
There are three complementary resources available to the operator:
- The platform's administrative panel
- A phone with the app to receive SMS and our notification app
- Bank's mobile app
If the request didn't close, but funds have been received, you need to match the amount in the request and the amount actually received.
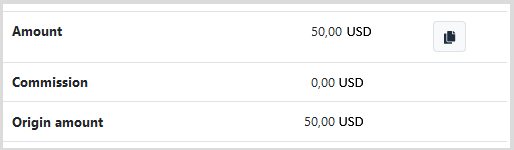
For traders that use currency conversion, the request amount is entered in the request in the Origin amount box.
For traders that do not use currency conversion, the request amount is entered in the request in the Amount box.

Sender information is displayed just below. The bank name is usually provided, but may be omitted.
Then, go to the SmsHub section and look for the in-payment record.

If you find one, link the SMS to the operation (request). If there is no SMS, report the operation ID to the technical support team and indicate that the operation should be assigned "success" status with the correct amount.
Sender information is indicated in SMS, in the app, or in the SmsHub section—it should match the information in the Customer account name field in the request.
If SmsHub doesn't have any information about the SMS, you need to stop using the account and find out why there's no information available. Check all incoming payments and send the list of the operations to be assigned "success" status to the technical support team.
Appeal processing
If you receive a payment for an amount different from the request amount and you are not sure the payment matches the request, you can use the following template to post the message in the technical support chat:
Request <request_id> is for 13 000, but the actual incoming payment amount is 12 600.
Please, check the sender and if everything is correct, create a request for 12 600.
Attach a screenshot of the in-payment with the sender information or SMS to this message.
Any request to the tech support team should be sent only when the trader has checked everything and has found no matches in the system!!
If the operator is sure, but the amount is still different, the operator can link SMS to the request in the SmsHub section. Linking SMS is available at any moment, even within the 20 minutes while the request is not completed yet and you can see you received a different amount, or the correct amount was received later (after automatic decline). This action is intended to reduce the percentage of appeals if used correctly.
To find which request corresponds to specific in-payment to, you can use the payment time. The payment always arrives after the operation is created, usually within a couple of minutes. Longer delays are very rare. Customers can err for significant amount, so most often there is an operation corresponding to the payment, even if the mismatch is considerable. It is common error that the actual sender is not the one indicated on the card.
What to do if the receipt amount and the initial amount are different (for auto appeals)?
If in the auto type appeal the amount specified in the receipt and the initial operation amount are different, you must:
- decline the appeal;
- create a ticket with the request to successfully close the operation with the actual amount.
If you confirm such appeal, the operations will be closed with the initial amount leading to FINANCIAL LOSSES!
In case you need to adjust the status (after automatic decline), but not the amount, you may simply message the Support chat like this:
Please, assign success to <request_id>, amount - <enter the amount and currency>
If automatic matching failed to close a payment, but the amount and the sender are correct, the operator is required to immediately assign the success status to the payment manually. The operator can change the request status to success within 15 minutes from the moment the request is created, provided the request is still in the awaiting status.
Always specify the request ID!
To ensure quick and easy navigation through responses, specify in your response the request ID you received from us. For example:
Please, assign success to <request_id>, amount - <enter the amount and currency>
or
Please, assign fail to <request_id>, amount - <enter the amount and currency>
How to reduce the number of appeals?
The maximum percentage of appeals allowed is 0.5%. This amount covers the 0.3% of appeals due to the customer fault and 0.2% of appeals due to operator fault. All requests for which the final status or amount has been changed are considered appeals.
1️⃣ To reduce the appeals number, the operators must continuously verify created requests online in their personal account and actual in-payments in the mobile bank app. If the operator discovers that there is an in-payment for a request, but the automatic matching failed to close the payment, the operator should assign the payment the success status manually.
The operator can change the request status to success within 15 minutes from the moment the request is created, provided the request is still in the awaiting status. In this case, the request will not be regarded as an appeal.
2️⃣ A bank app opened on the same device where the SMS viewer app is installed prevents SMS and push messages delivery to our server. This leads to more unclosed requests resulting in even more appeals.
That is why when you buy/buy back Tether, for better use of bank apps we recommend you to do either of the following:
- switch your account off temporarily
- not download our app on the same device as the bank app.
3️⃣ Review SmsHub more often and promptly react to unaccounted requests. If you receive an amount which is different from the request amount, but payment time and sender match the request, you should link SMS to the request in the SmsHub section.
If there's any doubt, contact the Support chat and send the SMS text, SMS ID and the request ID for compliance check.
4️⃣ When the customer clicks "I paid" button in the payment form, the request automatically goes to the In work section.
If the payment amount is correct, the request is automatically closed with the success status.
But if the customer pays an incorrect amount or doesn't pay at all, the request is assigned the "Confirmed" status, and the trader needs to process it manually by assigning it the final status. If there's an in-payment with the amount which is different from the one in the request, then you are required to link SMS to the request to change the amount. If there's no in-payment at all, you should decline the request.
You cannot hold requests in the "In work" section longer than 30 minutes. Requests in this status block the trader's balance, that could otherwise be used.
This way, you can reduce the number of possible appeals and work more effectively.
Balance top-up rules
Balance can be topped up 24/7 using the platform's facilities.
General platform setup instructions
Roles: Partner, Super-Operator, Operator
The platform uses the following account hierarchy:
Partner—the main account with full access to all the admin panel sections and groups (teams).
Super-operator—a manager, team lead, main trader, Partner's assistant. Can also be an operating trader in some teams.
Operator—a trader, an employee who monitors transactions and interacts with the platform's tech support team.
When integrating for the first time or adding a new super-operator, the whole setup begins with the Partner. Until the partner completes the setup, the downstream accounts will not be able to work. The same applies for the operator.
Here are some examples:
-
In order for the operator to be able to use the platform, first, the partner should complete the settings, and then the super-operator should do the same.
-
Before adding any new operator to an existing team, the super operator should complete the setup.
-
Before adding any new operator and/or a super-operator to a new team, first, the partner must complete the setup, and then the same must be done further down the hierarchy.
After setting up the VPN and authorizing in the administrative panel, you can start using the platform. At all times, only one VPN configuration can be run on a device.
Partner liability:
- Partner—platform's initial setup, additional setup when integrating new groups (teams), distribution of balance from Personal to Trader, internal work organization.
- Super-operator—overlooking the group (team), accounts (tokens), control over account traffic and initialization, troubleshooting settings. Can also act as an operator (trader).
- Operator (trader)—overlooking the performance of the phone and the app, finalizing the requests, in case of noticing incorrect functioning of the platform/app - informing the management and the platform's tech support team and taking corrective measures. The operator is obliged to make sure the requests aren't held in the In work tab longer than 20 minutes from the moment the request is created, as well as coordinate with the platform's tech support team during appeal processing. Appeal response time is 30 minutes.
Appeal processing rules
The customer can create a request and:
- fail to pay—the account remains idle, the idle time depends on the previously agreed number of simultaneous requests per account;
- pay an incorrect amount—the operator should notice it and link the corresponding SMS.
- pay, but the request does not automatically close—the operator should notice such operations and report them to the tech support team to identify and eliminate the causes of such behavior.
The trader monitors incoming payments in real time, and if the payment amount is different, then the operator is expected find the correct request, compare it to SMS and link it to the correct request.
Processing requests in the In Work section
The customer can click the I paid button on the payment page, in that case the request is automatically sent to the "In work" section, and if there's a correct incoming payment, then the request is automatically closed as a success. Although, if the customer posts an incorrect amount or doesn't transfer anything at all, then the request remains in the "Confirmed" status, and trader is required to process the request manually by assigning the final status. If there's an incoming payment for an amount different from the one in the request, then the operator should link the SMS to the request to change the amount, and if there's no in-payment at all, then the request is to be declined.
The requests in "In work" should be promptly processed!
It is not allowed to hold requests in the "In work" section longer than 30 minutes.
Specify the request ID when asking questions in chats
To ensure quick and convenient navigation, specify the request ID when posting your questions in the Support chat. Here is an example:
Please, assign success to <request_id>, amount - <enter the amount and currency>
or
Please, assign fail to <request_id>, amount - <enter the amount and currency>
Platform description
Personal profile (email) and account can be used in the system only once and registered under only one partner!
Going online and processing requests is recommended for the users with the roles of operator and/or super-operator.
In the upper left corner, under the user details, there is a button for entering and leaving a shift.
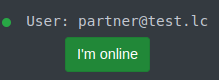
When the Offline icon is displayed, the profile isn't on shift and the traffic won't be directed to it.
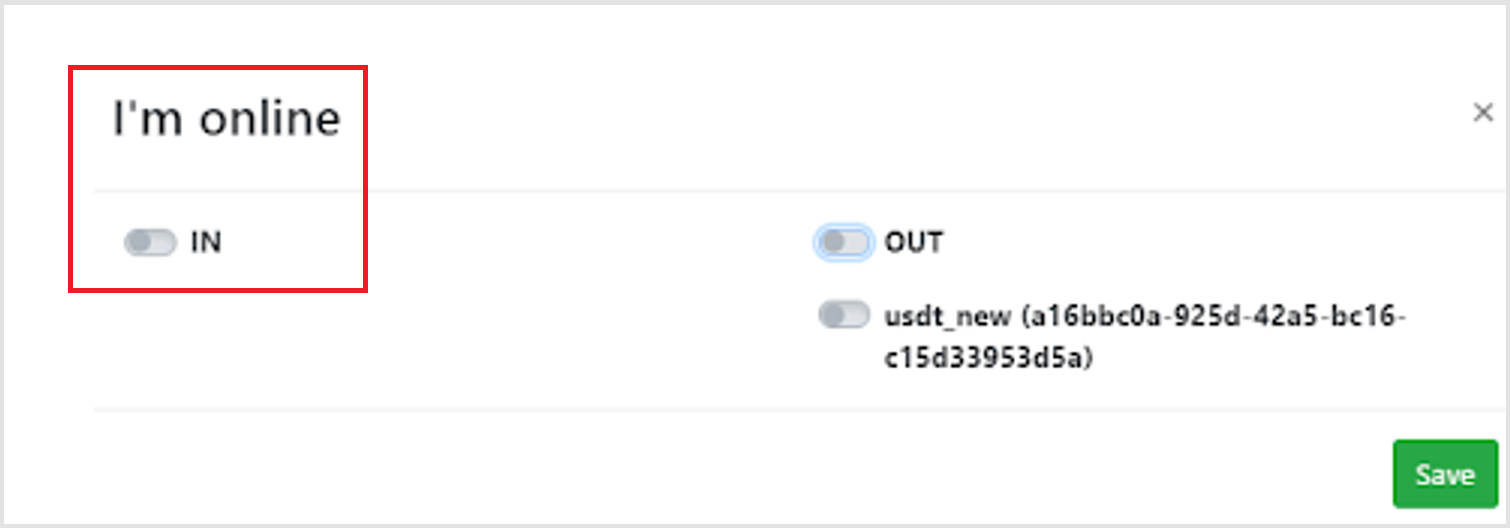
I’m online—means that the operator is on shift and ready to process requests.
When going online, you can choose the incoming traffic type (from previously agreed types). Specify IN—to accept traffic. OUT—to accept requests for payouts, below you can choose the balances to be used for payouts. You can check and clear each box separately.
Payment features
The payout logic is as follows:
If a balance is assigned to a group consisting of more than one user, then disabling one of them does not cancel payouts.
To stop (cancel) payouts all the group's users must be disabled!
ATTENTION!
The operators ready to control traffic and promptly process requests should go on shift.
If the super-operator goes on shift, then all the accounts of all their groups (teams) will be available for requests.
If the partner goes on shift, then all the accounts of all super-operators and their groups (teams) will be available for requests.
You don't need to manually switch accounts to the Active status! (If you need for all the accounts to go on and off all together by clicking I'm online.)
Setting a time zone
The time zone of the current user is displayed in the upper right corner of the administrative panel (see the screenshot).

Before you start, be sure to set your time zone—always choose the time zone used by your team.
It is important to remember that the limits set for accounts and groups of accounts are applied according to the time zone of those users who set the limit. For example, if a user from UTC-0 time zone creates a 24-hour limit, this limit will apply from 00.00 to 23.59 UTC-0—for the user and any other user in the UTC-0 time zone. If a user sets the profile to UTC+3, then for this user the limit will apply from 3.00 to 2.59 of the next day. There's no way to check in which time zone a limit was created. Therefore, to avoid confusion all the team members should use the same time zone and never change it!
Your current time zone affects the date and time displayed in the interface, i.e. time and date of requests and other objects are set in you current time zone. In any data you export, the time is displayed by the time zone of the person who exported it.
The single time zone for a team
A team (partner) should use the same time zone and never change it!
Personal profile sections
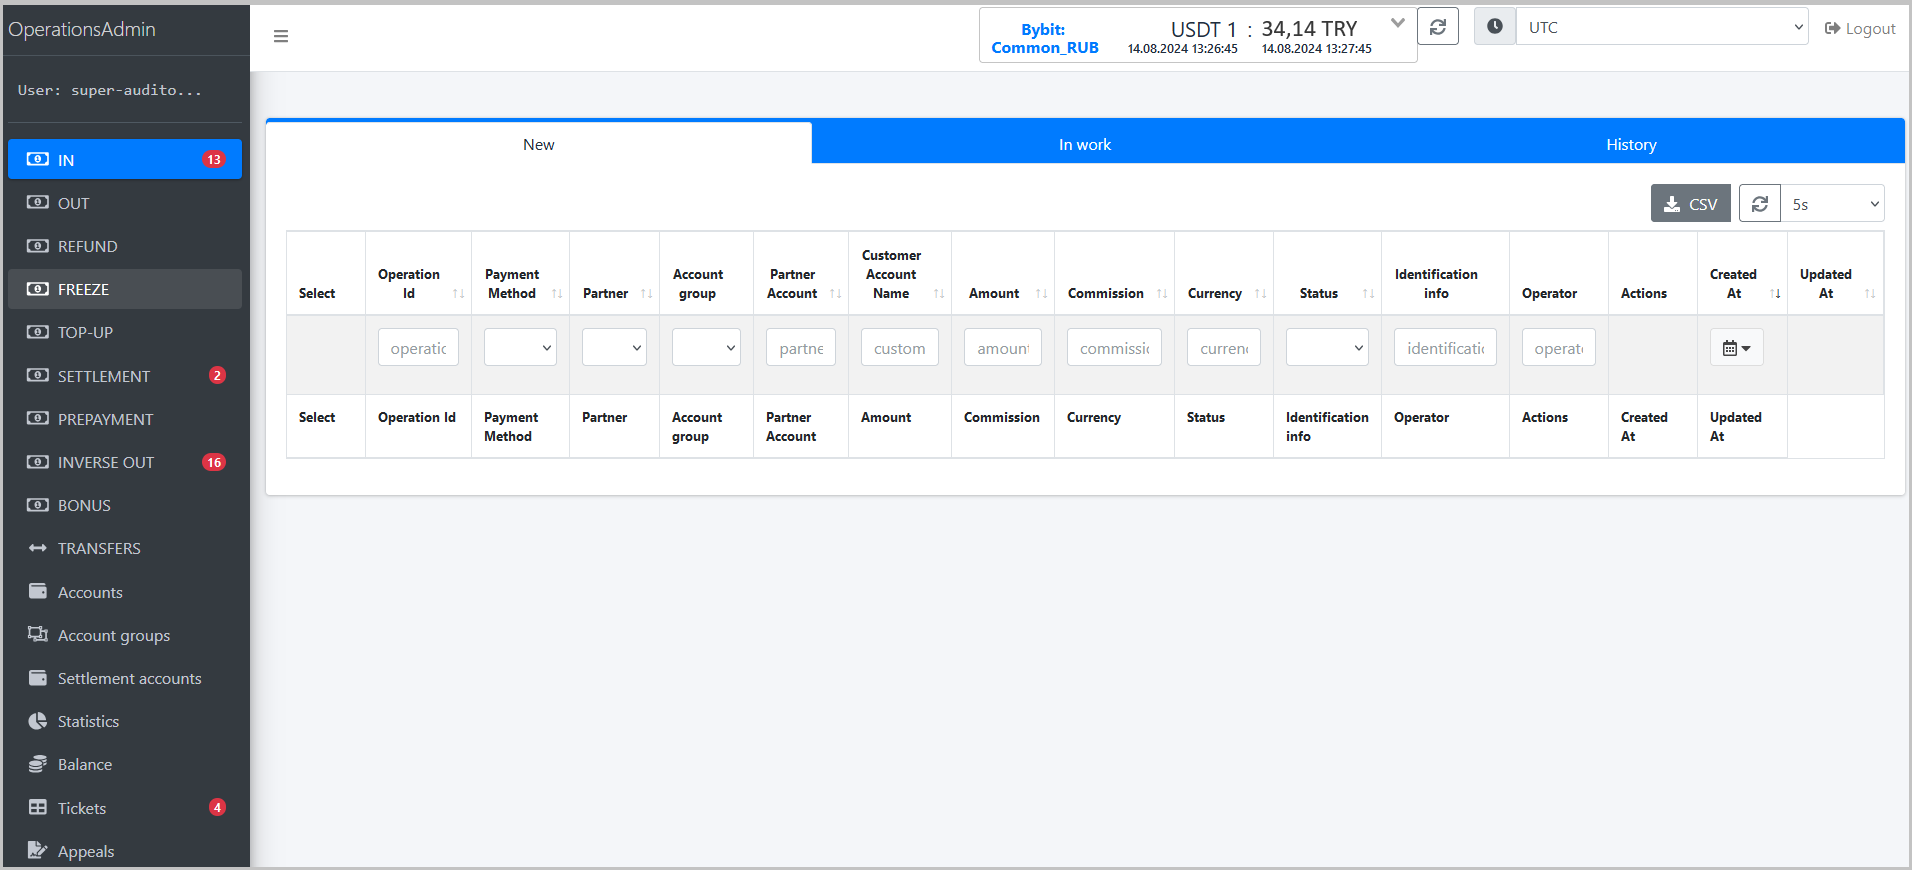
In the sections that display operations, the window is divided into three tabs:
- New—the tab with new requests.
- In work—the tab with the requests that the operator is working on or upon which the customer reported an incoming payment. In the latter case, the request is assigned the
confirmedstatus and the operator has to process it manually, so that it does not remain "suspended" for an indefinite period of time. - History—a tab with requests in the final status.
IN, OUT, SETTLEMENT sections
Currently, these sections are not used by traders.
Tickets section
This section includes the information about requests for correction by the tech support team.
PREPAYMENT section
This section contains incoming requests for money transfer to your account or token.
The section has three tabs:
-
New—the tab with the new requests.
-
In work—the requests that the operator started to process manually and clicked Start processing at the bottom of the page to open the request for editing.
If automatic processing is set up, the request skips the In work section and goes to the History section: either as failed due to auto-finalization—if the customer didn't transfer the money, or as success—if we the SMS is available in the platform.

The platform operates in a dual mode, allowing you to perform both manual and automatic processing. If the automatic processing isn't set up or doesn't work correctly, the operator must finalize requests manually. Any cases of the automatic processing malfunction must be reported to the platform's tech support team, and while the issue is being sorted out, the account should be disabled. The platform's tech support team can do this for the Partner. The partner or the super-operator should identify the problem account and provide its ID to the tech support team. If the operator runs only one account or automatic processing malfunction is observed on all of their accounts, the shift must be closed by switching to the Offline mode.
In the request section, there is an option to export data. To do so, click the CSV button in the History section.
INVERSE-OUT section
This section is used for payouts from the trader to the customer. You use this section to watch for incoming payout requests and process them. After payout is made, the trader's balance increases.
Contact your account manager to use the INVERSE-OUT section.
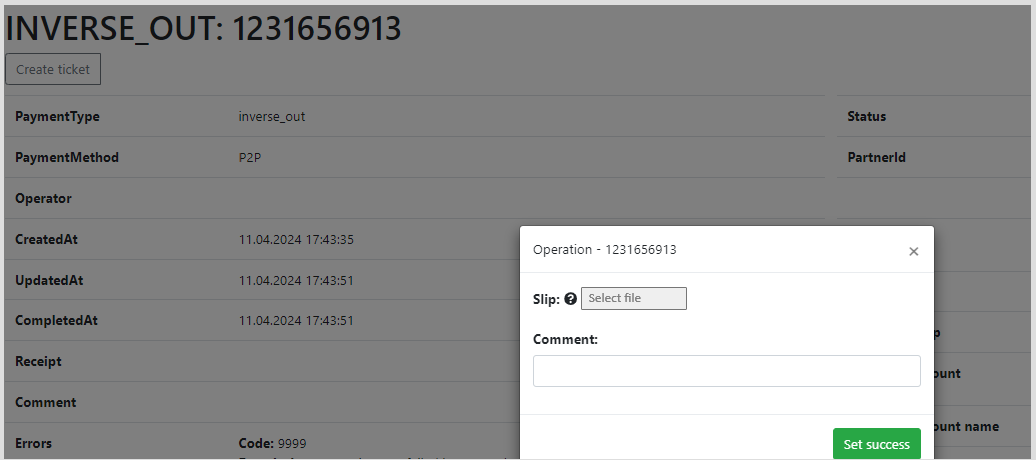
How to process payouts?
-
Open the New tab in the INVERSE OUT section and click the ID of the required payout request in the Operation ID column.

-
Click the Start processing button to reserve the payout request.
- Check that the user and bank names specified in the Customer account name and Customer bank boxes are correct.
These values are specified by the customer and, therefore, can differ from the ones specified in bank mobile app. If the user and/or bank names are different, you double check that the details are specified correctly. - If the details are correct, make a payout of the amount specified in the Amount box to the account specified in the Customer account box. You can use the copy buttons in these boxes to copy the amount and/or the customer account values to an app that is able to exchange the information with your phone, for example Telegram.
- After you complete the payout, copy the receipt from your banking app to your computer.
- In administrative panel, click Success.
- In the window that opens click Select file, and then select and upload the PDF file with the receipt that confirms the payout.
Receipt file format
The format of the receipt file must be PDF.
TRANSFERS section
This section shows the transfers from the Personal (Partner's) balance to the Trade (team's) balance
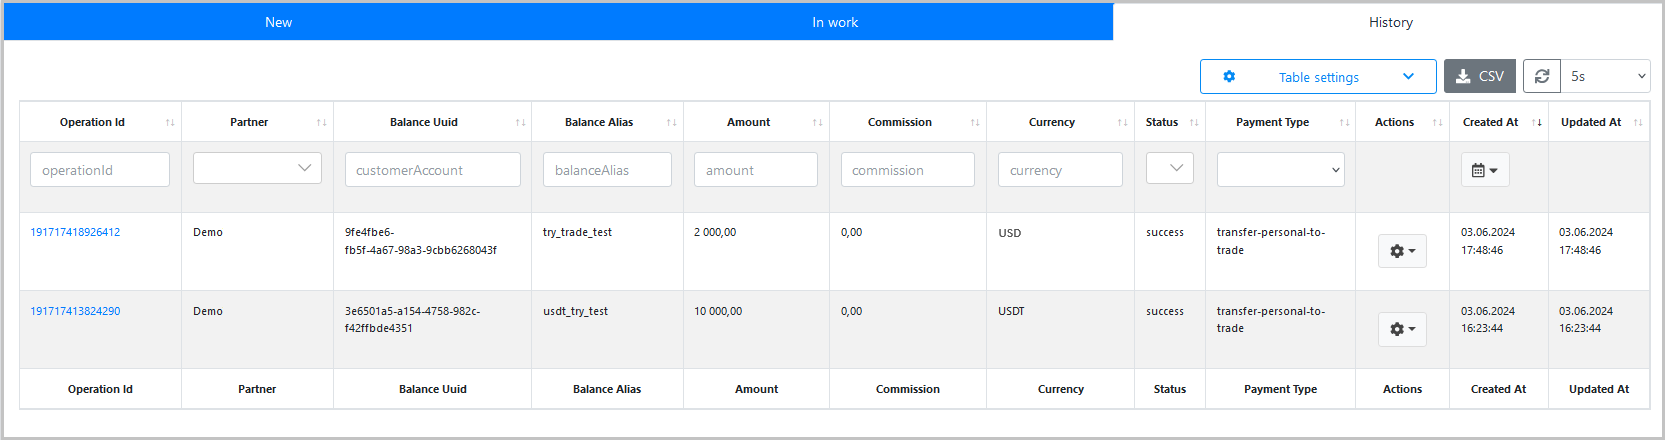
The section displays information about the name of the trader balance, amount, currency, transfer type (from and to), transfer time.
TOP-UP
This section contains platform's balance top-up operations.
BONUS
This section displays operations with a bonus from in-payment, i.e. revenue:
- When you deposit 1000 USDT, a 1000 USDT top-up is created, and the bonus is immediately added according to the agreed conditions.
- On top of that, a bonus is credited for each payout (buyout).
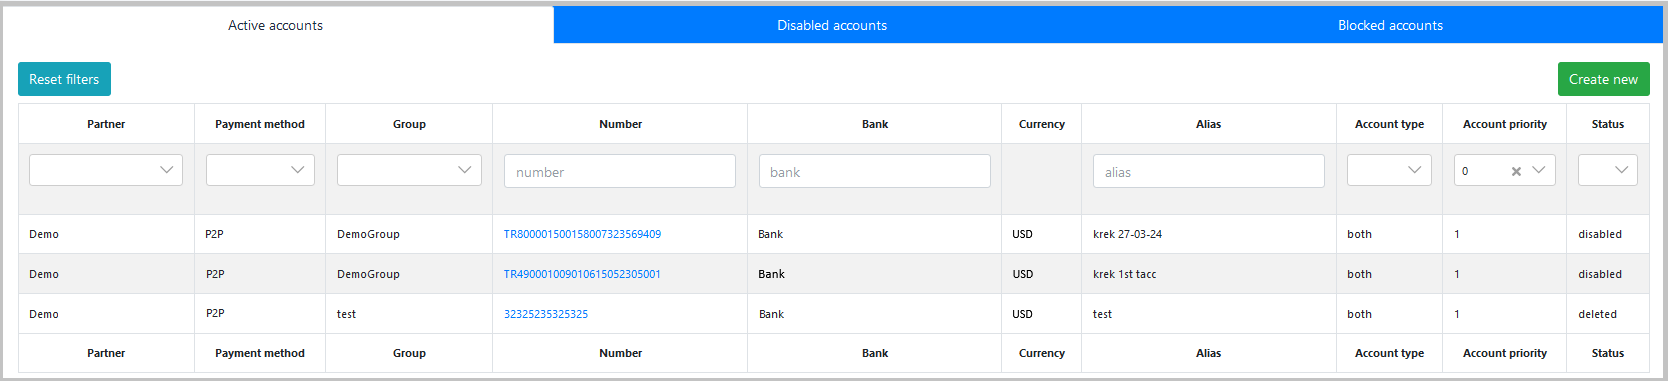
Accounts section
This section displays accounts. The right pane is divided in subsections: Active—active accounts that receive traffic, Disabled—accounts disabled for some reason.
Accounts cannot be deleted from the platform!
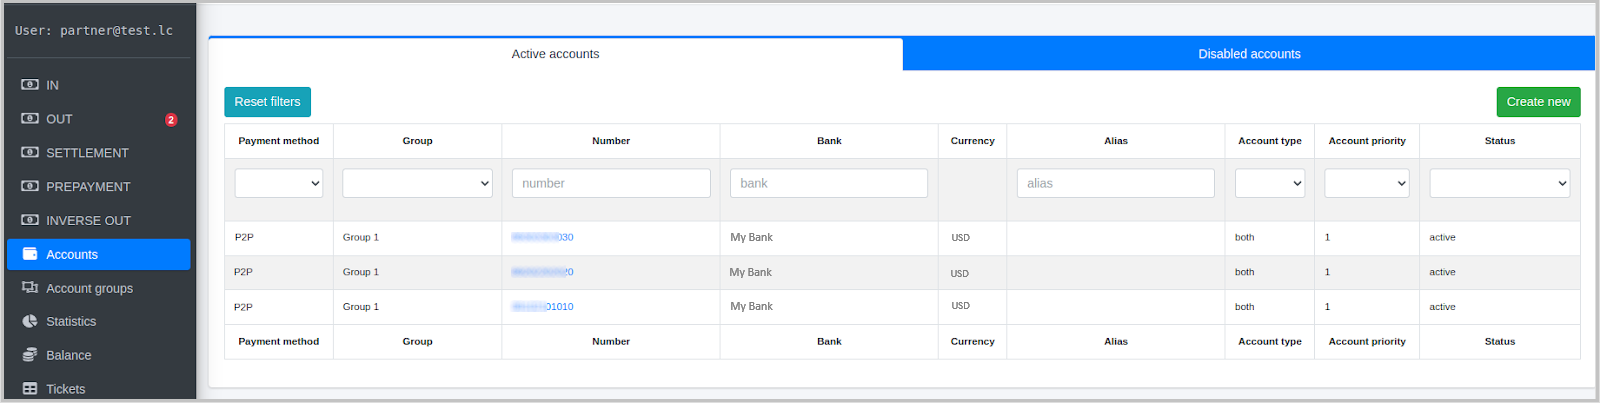
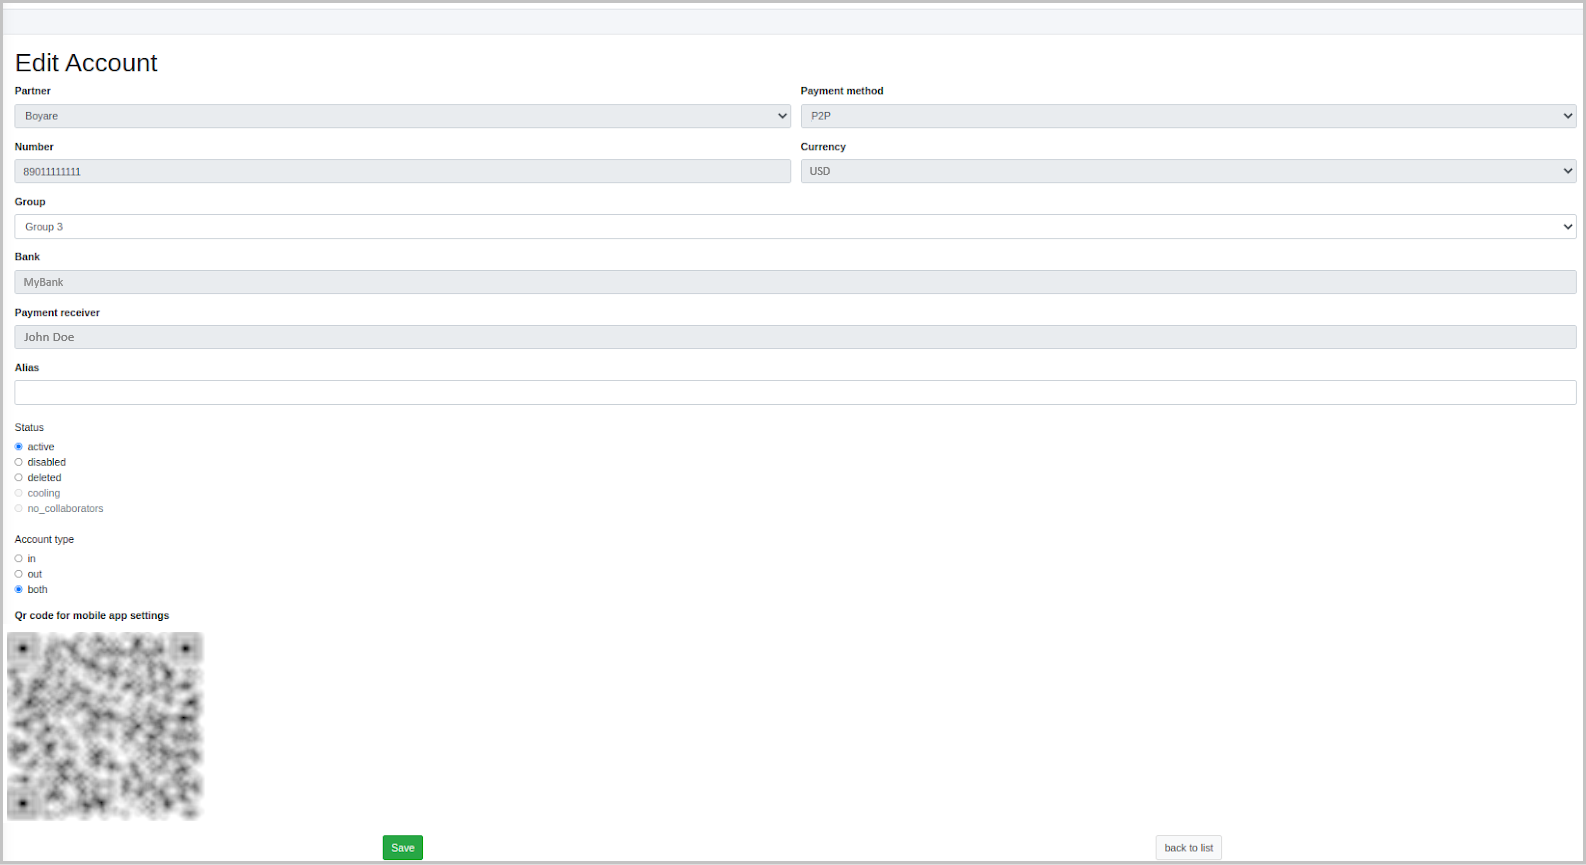
To open the account page where you can update its details, click its ID in the account list. You can only edit the Alias box which contains user-friendly account description.
Always choose both as an account type, because other types won't work correctly and the account will stay idle.
Account statuses
Depending on the situation, an account can be in different statuses:
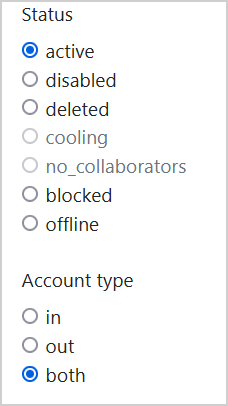
The following table lists possible account statuses along with their description.
| Status | Description |
|---|---|
| Active | Traffic is directed to this account automatically, even if the operator is offline. Do not set this status unless it is absolutely necessary! |
| Disabled | The account is temporary disabled, you can enable if needed. |
| Deleted (a red button is shown at the very bottom) | the account is disabled for some reason, isn't visible to users, and not available for any action. The account is available to the tech support team only. This action only hides the account, but doesn't delete it! You cannot create the same account the second time! We strongly recommend that you carefully check the information you enter when creating new entities and check the information twice before clicking save to prevent any mistakes in the future. To make an account visible again, make a request to the tech support and specifying the account ID. |
| Cooling | This is obsolete status, not used any longer. |
| No_collaborators | This is the automatic status assigned to all newly created requests when either when account leaves the automatic offline status or when the operator closes the shift and goes offline. Once the shift is opened, such accounts are automatically assigned the active status. |
| Blocked | This status is assigned to the account when the conversion drops considerably (multiple failures). To recover the account, you need to ensure it is operational. In other words, check the last 10 to 15 orders in the failed status whether the cash is actually received and make a test cash transfer to make sure the connection with SmsHub is OK. Once you successfully complete these steps, contact support service and ask to put the account back in operations. |
| Offline | This status is assigned to all the accounts associated with the phone number when connection with the device with this number is lost. Connection loss usually occurs when there is no feedback from the device for a long time or when the device's charge level drops below 5%. |
Limits subsection
There is the Limits section at the bottom of the account window where you can set the account limits. Limit is the maximum allowed turnover (total amount of operations) per account for a specified period of time. For example, if you set 10,000 as a daily limit, then after the turnover exceeds 10,000 during the current day, the account will be locked till the next day.

Limits and time zones
Limits for accounts use only the time zone of the person who set them.
For example, if a user from UTC-0 time zone creates a 24-hour limit, this limit will apply from 00.00 to 23.59 UTC-0—for the user and any other user in the UTC-0 time zone. If a user sets the profile to UTC+3, then for this user, the limit will apply from 3.00 to 2.59 of the next day.
There's no way to check in which time zone a limit was created. Therefore, to avoid confusion all the team members should use the same time zone and never change it!
To set a new limit:
- Click the Add new limit button in the Limits section of the account page.
- In the new line in the limits table do the following:
- Select the desired operation type in the Operation type column.
- Select Amount per calendar period in the Limit Type column.
- Enter the limit amount in the Limit Value column.
- Select a limit period in the Period column: hour, day or month.
- Click Save to save the new limit.
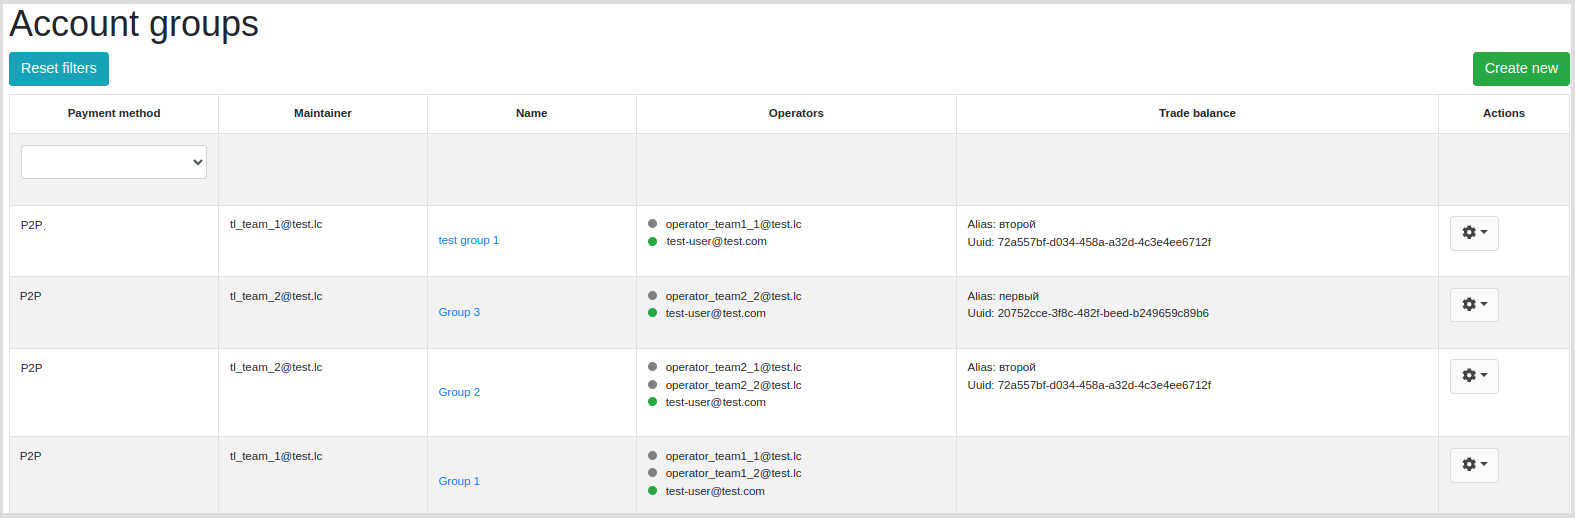
Account groups section
This section displays groups (teams) of the Partner
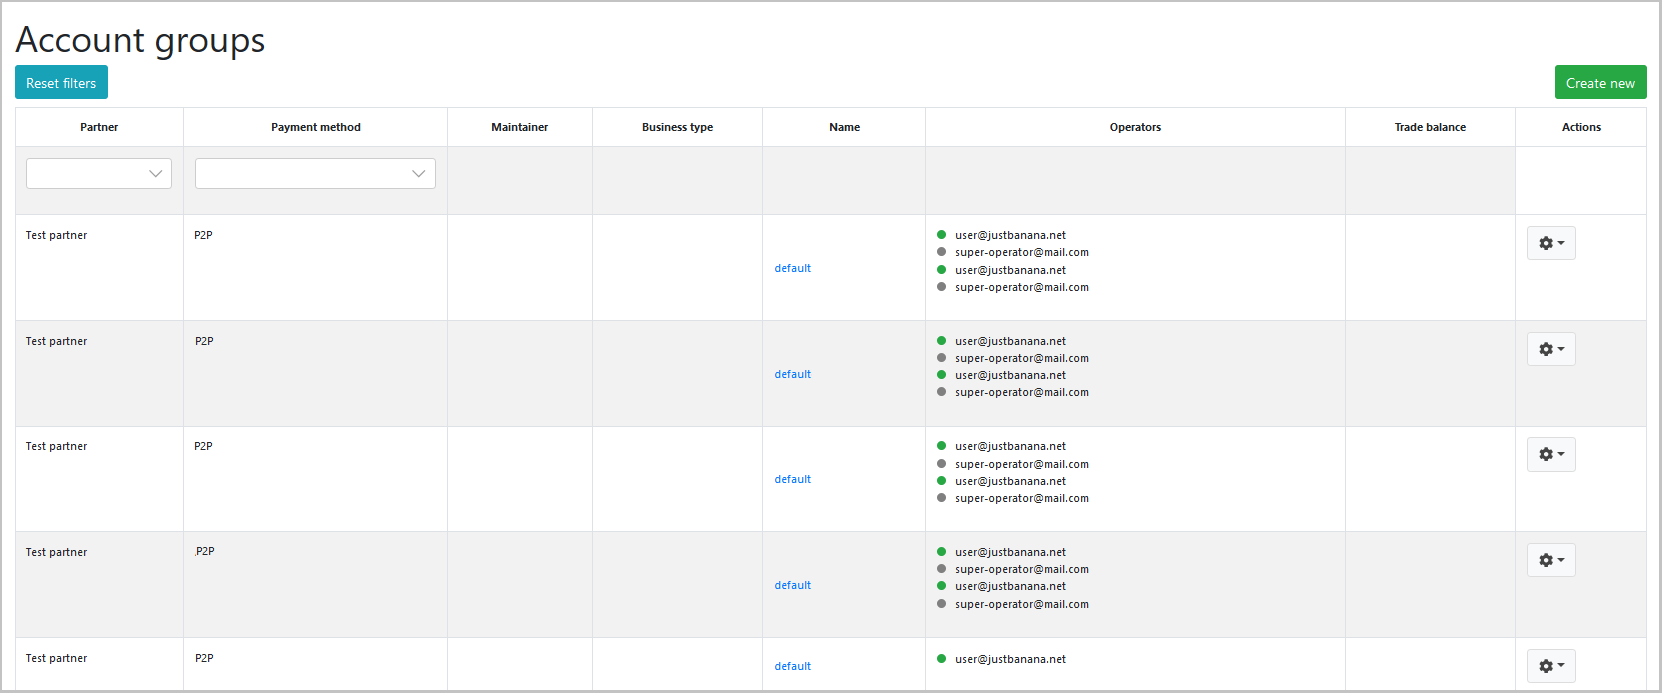
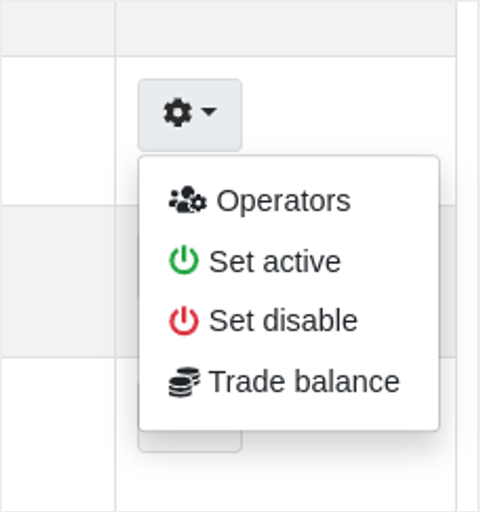
There are several ways to disable all the accounts of a group:
- All the group operators go offline (Provided the super-operator and/or partner aren't online! Otherwise they have to go offline too.)
- The super-operator or partner opens group section, clicks on the gear icon next the desired group and chooses Set disable.
Set active—turning on all the account of the current group regardless of whether operators and/or other users below them in the hierarchy are online.
Set disable - disabling all active accounts (assigning the disabled status).
Limits subsection
There is the Limits section at the bottom of the account page where you can set the account group limits. Limit is the maximum allowed turnover (total amount of operations) per account group for a specified period of time. For example, if you set 10,000 as a daily limit, then after the turnover exceeds 10,000 during the current day, the account group will be locked till the next day.
Limits and time zones
Limits for account group use only the time zone of the person who set them.
For example, if a user from UTC-0 time zone creates a 24-hour limit, this limit will apply from 00.00 to 23.59 UTC-0—for the user and any other user in the UTC-0 time zone. If a user sets the profile to UTC+3, then for this user, the limit will apply from 3.00 to 2.59 of the next day.
There's no way to check in which time zone a limit was created. Therefore, to avoid confusion all the team members should use the same time zone and never change it!
To set a new limit for account group:
- Click the Add new limit button in the Limits section of the account group page.
- In the new line in the limits table do the following:
- Select the desired operation type in the Operation type column.
- Select Amount per calendar period in the Limit Type column.
- Enter the limit amount in the Limit Value column.
- Select a limit period in the Period column: hour, day or month.
- Click Save to save the new limit.
Statistics section
This section provides statistical information for the group.
You need to regularly monitor statistics to timely discover malfunctioning accounts
The statistics is available to the super operator (for their groups only) and to the Partner (the Partner sees statistics for all super operators and groups).
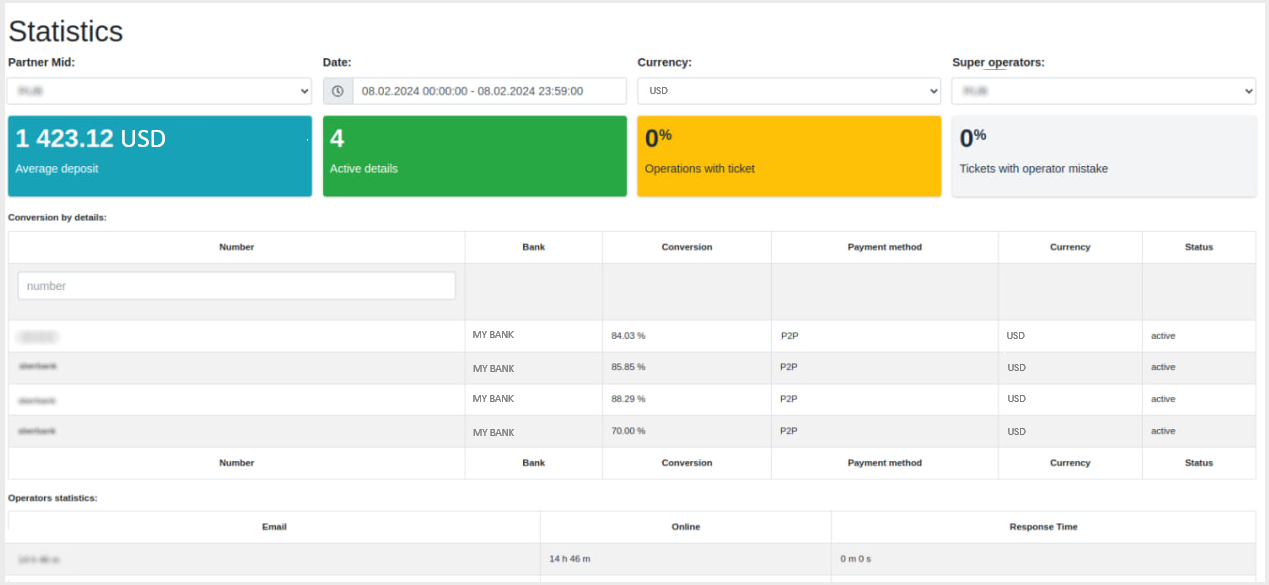
The super operator is selected in the upper right corner.
Below you will find the information about accounts and conversion. Note the lines where conversion is below 84% - in most cases this is because of phone malfunction.
You also must check everything that influence conversion: communication breakdown, shutdown due to energy saving, SIM card connection loss, etc.
On the screenshot, you can see an active account +90535***2182 with 70% conversion rate which is low. Acceptable conversion range is 84-100%.
We kindly ask you to pay special attention to such accounts. It may involve manual check of all in-payments for a period. You need to report the IDs of the operations that where assigned the failed status, despite they include incoming payments, to prevent negative user experience, appeals, complaints, and possible lock.
In this section, it is recommended to choose a time period to work with.
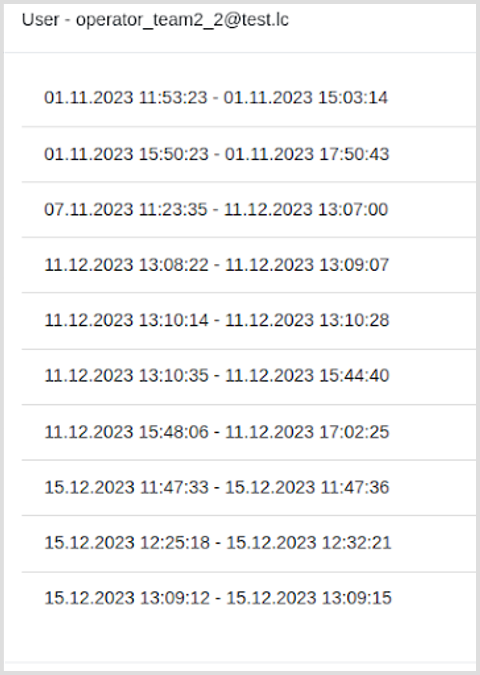
At the very bottom of the page, you can see information about operators and their time online (on shift) with work intervals.
On the left, there is an example of how operators' shifts are displayed.
Balances section
Here you can track Partner and Trader (team) balances.
The Partner can see both balance tabs—Personal balances and Trade Balances.
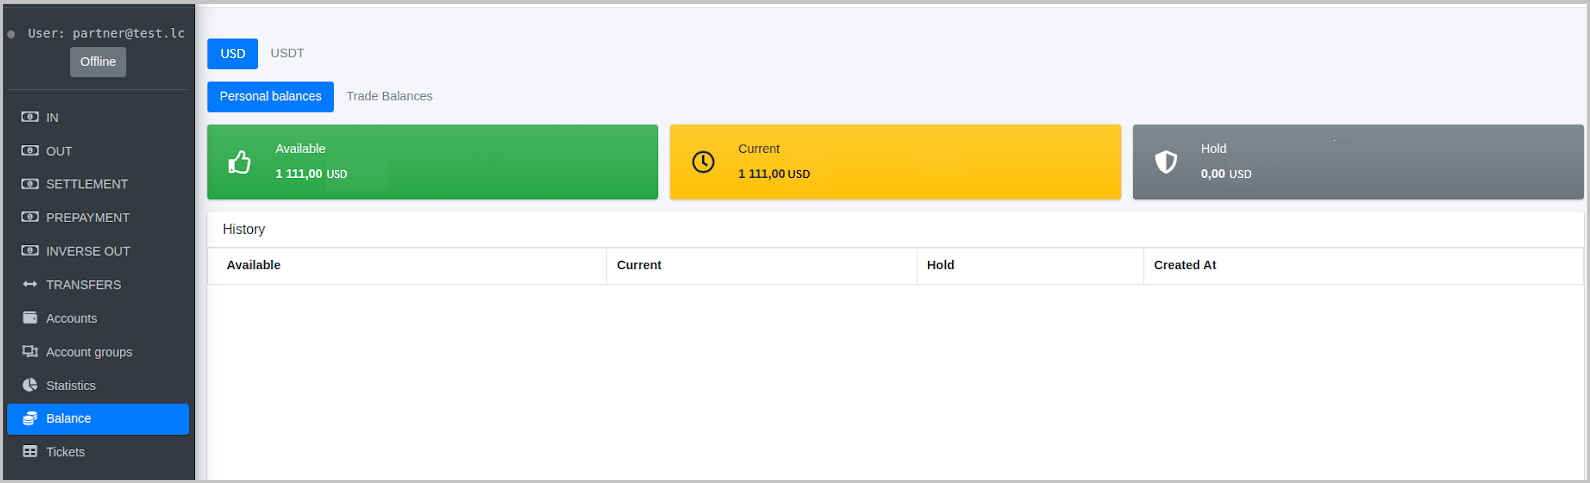
Personal—this balance is not used for traffic! The Partner distributes this balance funds to the balances of Trader teams. The tab also shows the history of operations on the balance.
Trade—every user can see this balance, and the operator and super-operator can see balances of the groups assigned to them.
How to top balance up
To top up a balance:
-
In the Balances section, click New TOP-UP to open the New TOP-UP window.
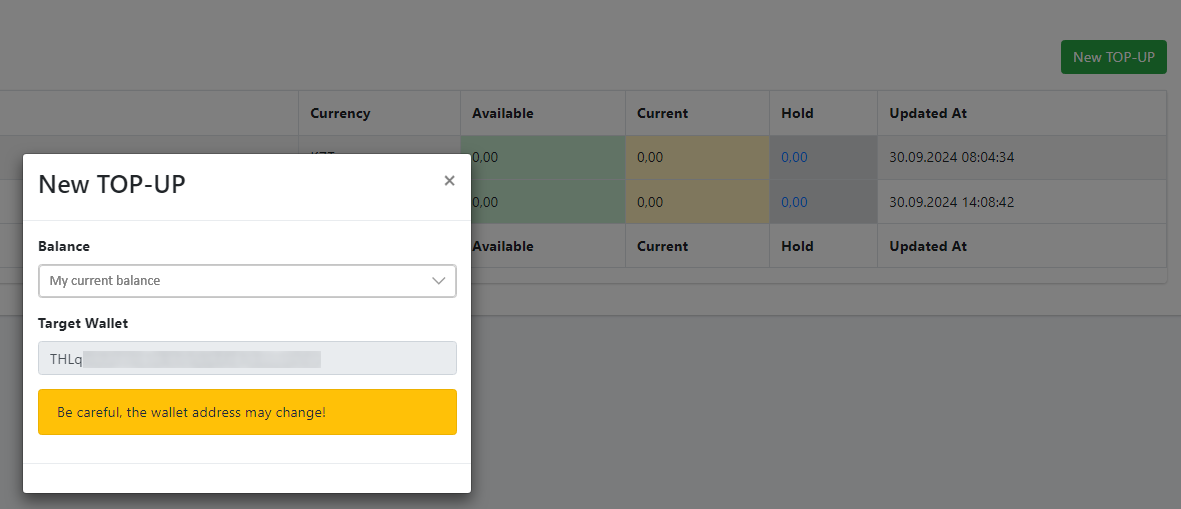
-
In the Balance box, select balance to top up.
The Target Wallet box will display the address of the wallet that corresponds to the selected balance.
-
To up the wallet shown in the Target Wallet box.
The balance will be automatically credited for the top-up amount within 5 to 10 minutes.
Appeals section
This section is intended for handling appeals.

The section includes three tabs:
- New—this tab contains newly arrived appeals, that are to be responded to within 30 minutes, otherwise the appeal is automatically resolved in favor of the customer. There are two appeal statuses:
new—new appealreopen—reopened appeal
- Clarification—tab with merchant appeals, for which the operator requested additional information.
- Fixed—shows the appeals that were processed. Such appeals can take following statuses:
success—the appeal was successfully completed based on the operator's responseexpired—the appeal decision is overdue and the funds were credited in favor of the merchantdecline—the operator didn't confirm an incoming payment
Search by operation id
In the Appeals section, you can search for information by the operation ID by entering the search string in the Operation ID field.
Current unprocessed appeals
If there are new appeals that require your attention, the number of unprocessed appeals is shown in the left panel in the red circle next to Appeals line.

Appeal details page
To open appeal details, click its ID in the ID column. On the screenshot below, you can see a details page of an unprocessed appeal.

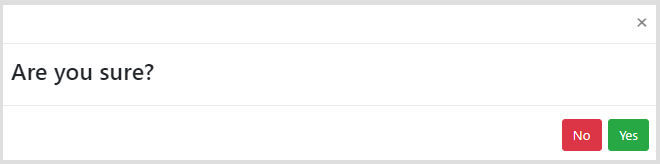
To confirm an appeal, click Accept to open a popup window with the Message and Receipt boxes.
When you confirm an appeal, the Message field is mandatory; include the verification details there, for example:
Received 5001 USD in two payments.
or
Received 400 USD in one payment.
The Message box is mandatory when declining (Decline button) and including additional information (Clarify button).
When you decline an appeal by clicking Decline, it is strongly recommended to attach documentary evidence to prevent repeated requests from the merchant.
SmsHub section
This section contains received SMS and the additional details.
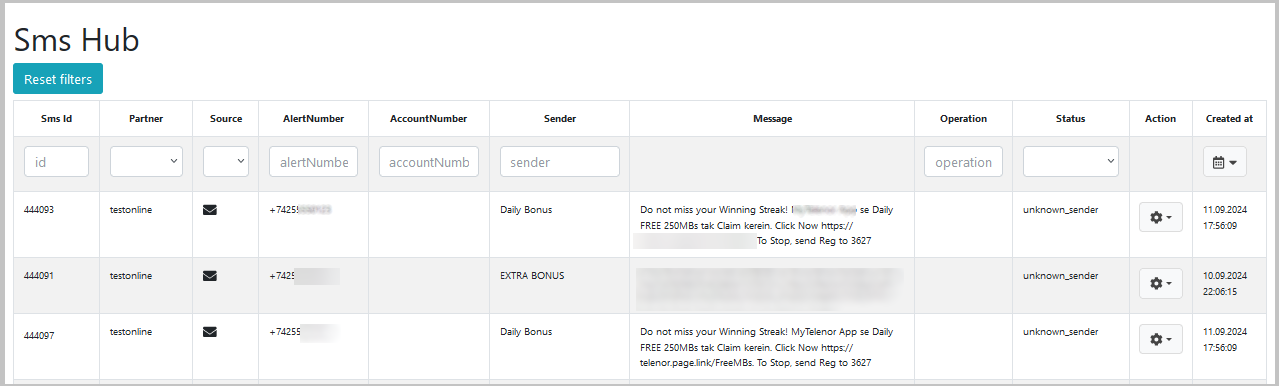
For each SMS, the following information is included:
- Sms id—SMS ID
- Partner—partner name
- Source—notification source: SMS, push, or SIM bank
- AlertNumber—the number of the phone where the app is installed
- AccountNumber—account ID
- Sender—sender
- Message—message content
- Operation—operation (request) to which the SMS is linked
- Status—SMS status
- Action—action to apply to SMS:
- Link operation—link SMS to an operation and set an amount to be linked
- Delete—delete SMS
- Created at—the time SMS was created in the database
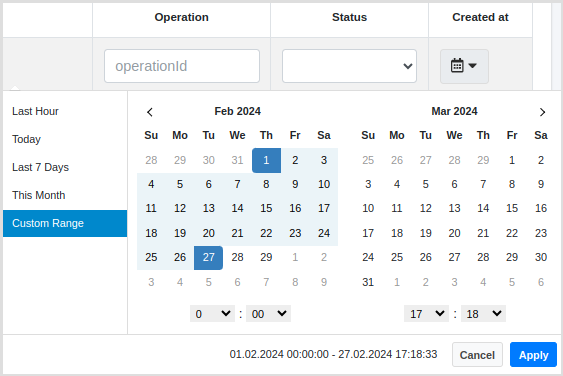
You can set the time interval for search by selecting the value in the left panel and clicking the Custom Range option and selecting the interval manually with minute accuracy. After you set the interval, click Apply.
Linking SMS to request
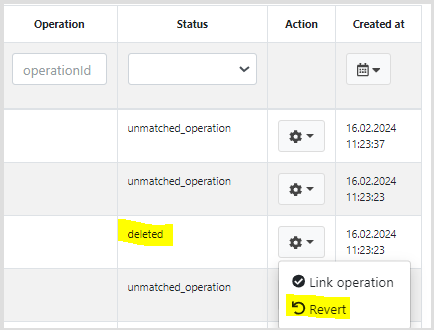
If there is an incoming payment to the account, but the request wasn't automatically closed and there is a matching SMS, then you can link the SMS to the request to assign the request the «success» status. To do so, click the "gear" icon and select Link operation.
If you click Delete, the selected SMS is marked as deleted and will not be visible in the SMS list. Deletion can be reversed. To do so, in the operation menu, select Revert.
In the window that opens, enter the request ID to link SMS to and click Save.
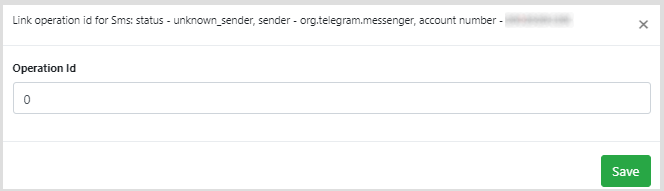
Confirm you action in the next window.
As a result, a request to the tech support is created. The operator will see this request in the «Tickets» section where you can and should monitor action history and results.
Changes are only displayed after the ticket is processed! And the ticket will be displayed in the History section.
If you link the SMS when the request is in processing (new, confirmed) status, then changes will be applied immediately without creating a ticket. This prevents appeals!
You can link the request to SMS in the following cases:
- the request is declined
- SMS isn't linked to any request
- the request isn't linked to any SMS
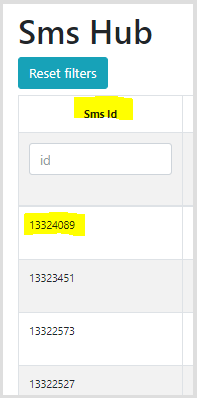
When sending SMS information to the tech support, make sure to specify the ID of the SMS. The following figure illustrates where SMS ID is located.
Request (operation) details page
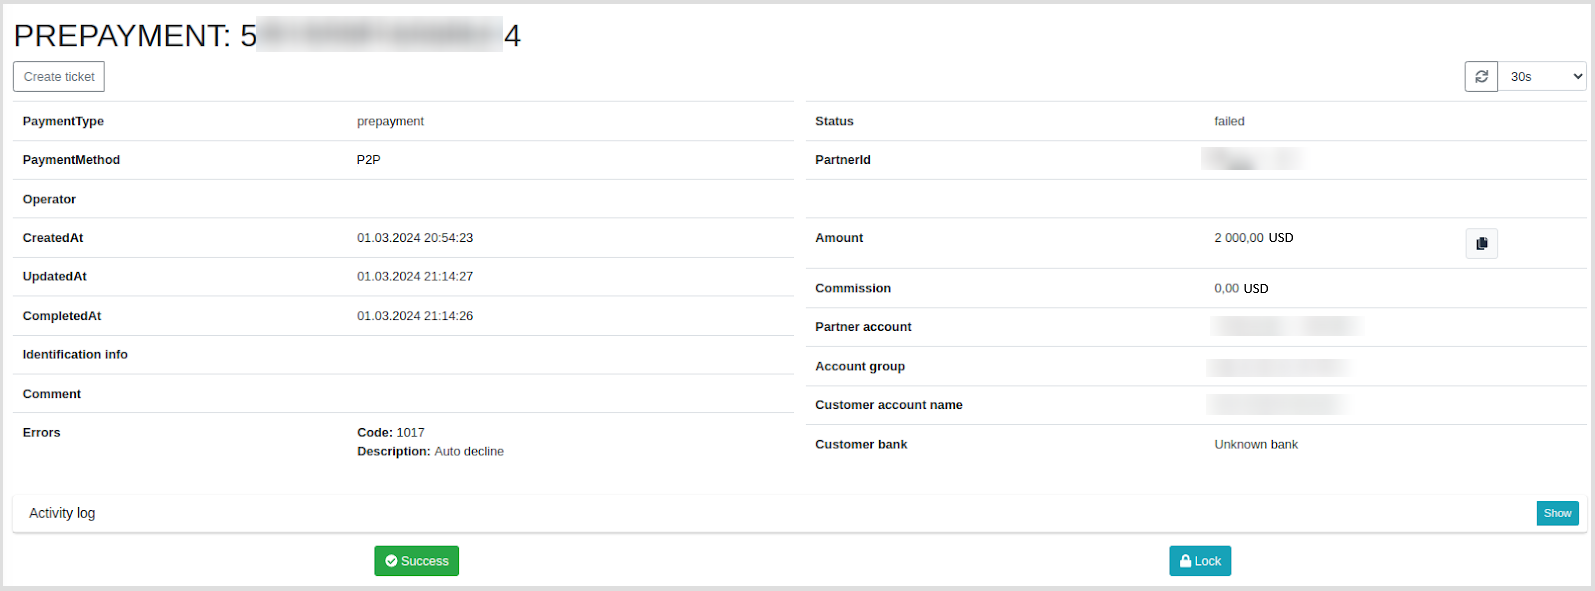
The request details page contains the following request information:
- Operation ID
- CreatedAt—creation date
- CompletedAt—completion date and time
- UpdatedAt—latest update date and time
- Comment—comment from the operator or tech support
- Errors—indication whether any error were encountered when processing the request
- Code—always 1017
- Description—request description. Auto decline in this column means that the customer didn't complete the payment and the request was automatically declined.
- Status—request status
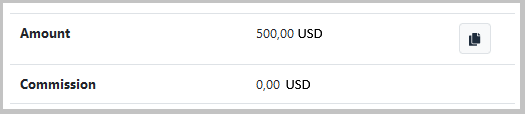
- Amount—amount to debit to balance
- Commission—commission to accrue
- Exchange rate—exchange rate applied
- Origin amount—the amount of the customer payment which will actually be credited to the account
- Partner account—the account to which the money will be credited
- Account group—the account group to which the account belongs
- Customer account name—details of the customer who should make the transfer
- Customer bank—details of the customer bank from which the transfer originates
Data export
You can use the request section to export data. To export data, click CSV in the History** subsection.
Data export allows you to view each request details with corresponding data, basic formulas and/or pivot tables, to generate analytical data across teams or across the entire partner.
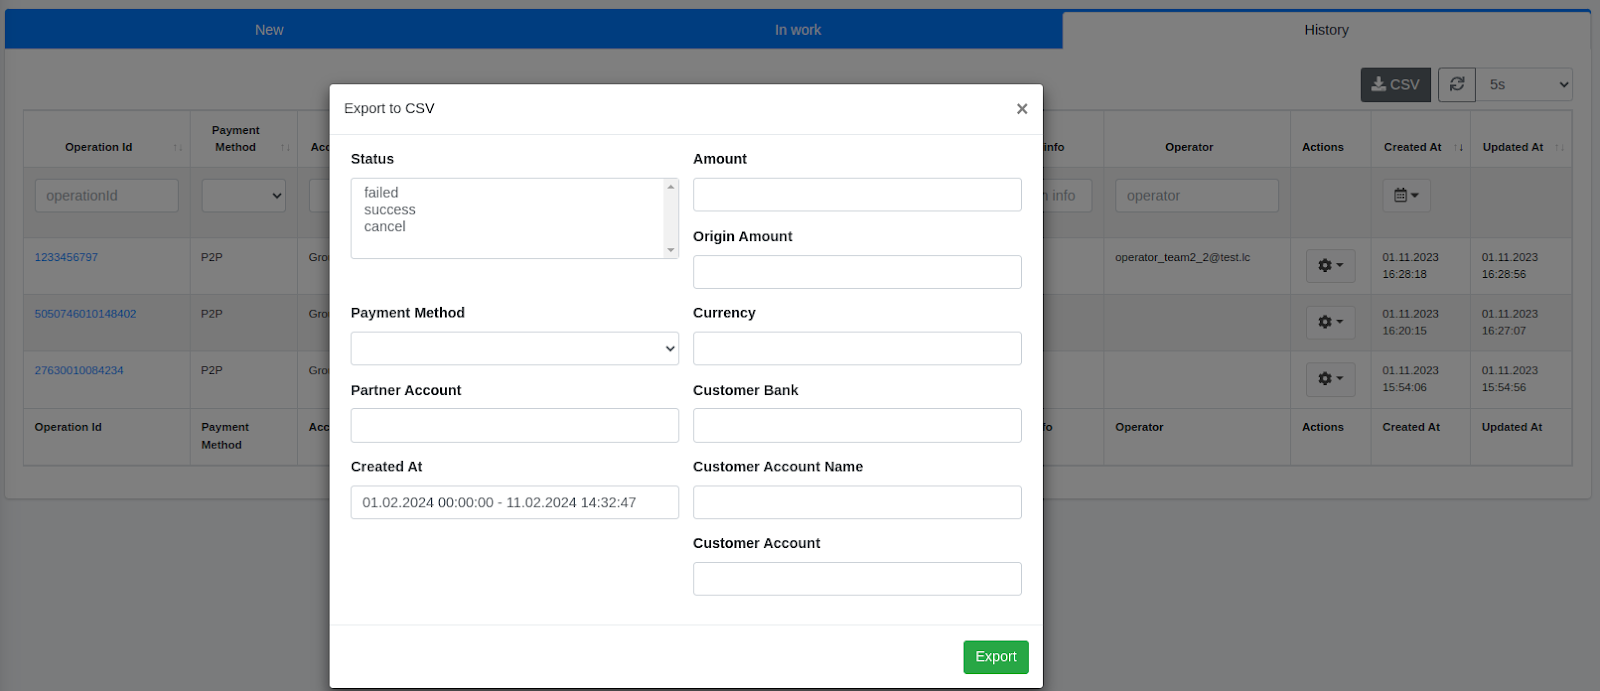
In the window that opens, select values in the search filters and click Export. The file will be downloaded to your computer.
To export data for specific account, enter its ID and the time interval. You do not need to fill in the remaining boxes.
Note that the exported data includes the amount in minor currency units, without any commas or decimal separators.
Here is an example:
US dollar is the major currency unit, cent is the minor currency unit. As we know: 1 USD = 100 cents.
The amount is specified in the minor currency units, so 10 USD is shown as 1000 and 1000.50 USD is shown as 100050.
Platform setup
The Partner performs the initial setup. The Partner must set up balances.
The Personal balances section shows the Partner balance; this balance isn't used for traffic but rather as a security deposit.
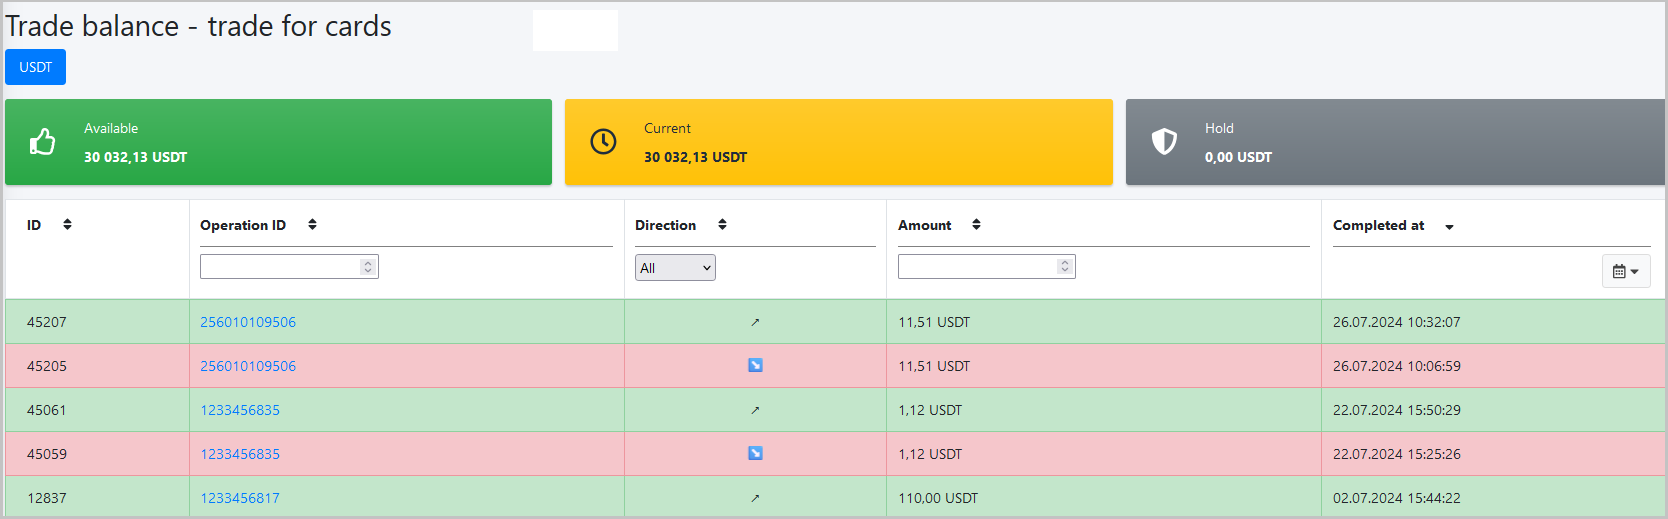
Open the Trade Balances section where the balances are displayed available for requests. Adequate amount on the trade balance allows you to start processing traffic.
This section contains the following columns:
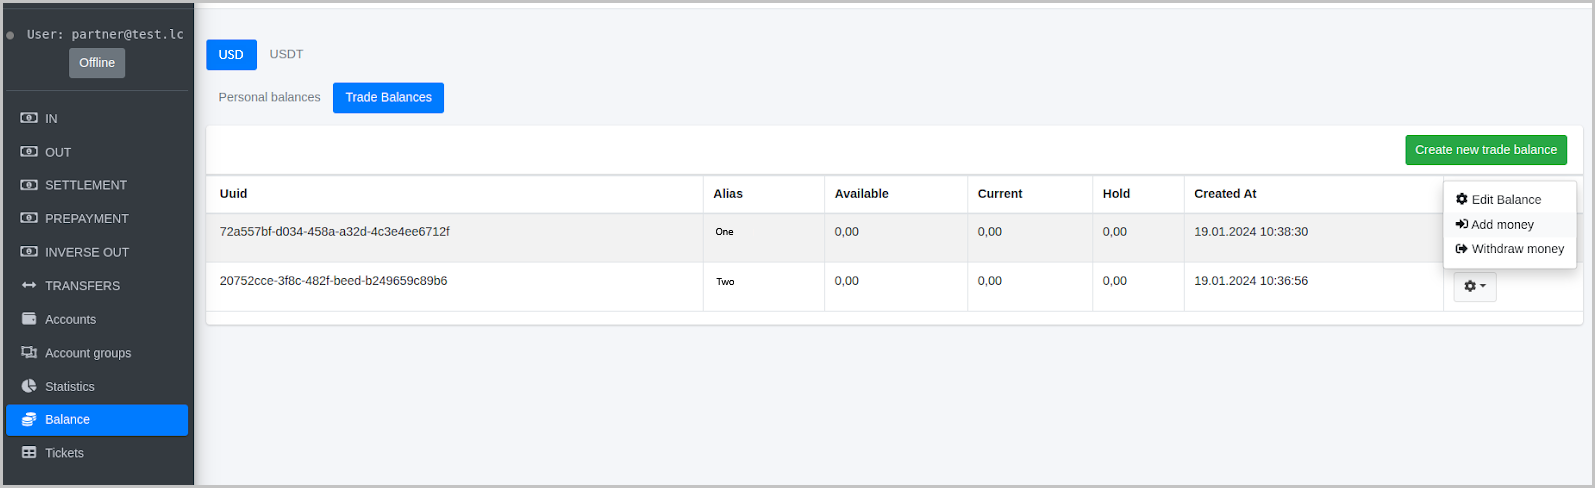
Uuid—platform's internal ID
Alias—the name entered by the Partner
Available and Current—balance currently available for requests
Hold—balance of the requests that are currently being processed
If successful, the funds will be irrevocably withdrawn. If an in-payment isn't completed, the funds status will be change from hold to Available.
In this window, you set up the required number of initial balances. To create a new balance, click Create new trade balance and enter the name of the new balance. (We recommend assign user-friendly name instead of just numbers.)

After you create all the required balances and the main balance has positive amount, you top up trader balances from the common balance.

Click the gear icon next to the required trader balance if you need to do one of the following:
- Edit Balance—edit the balance name
- Add Money - transfer funds from the partner balance to the trader balance
- Withdraw Money—transfer funds from the trader balance back to the partner balance
Trader balance top-up menu, where you only need to specify the required amount at the very bottom.
The Partner is required to create a group. To do so, open the Account groups section.
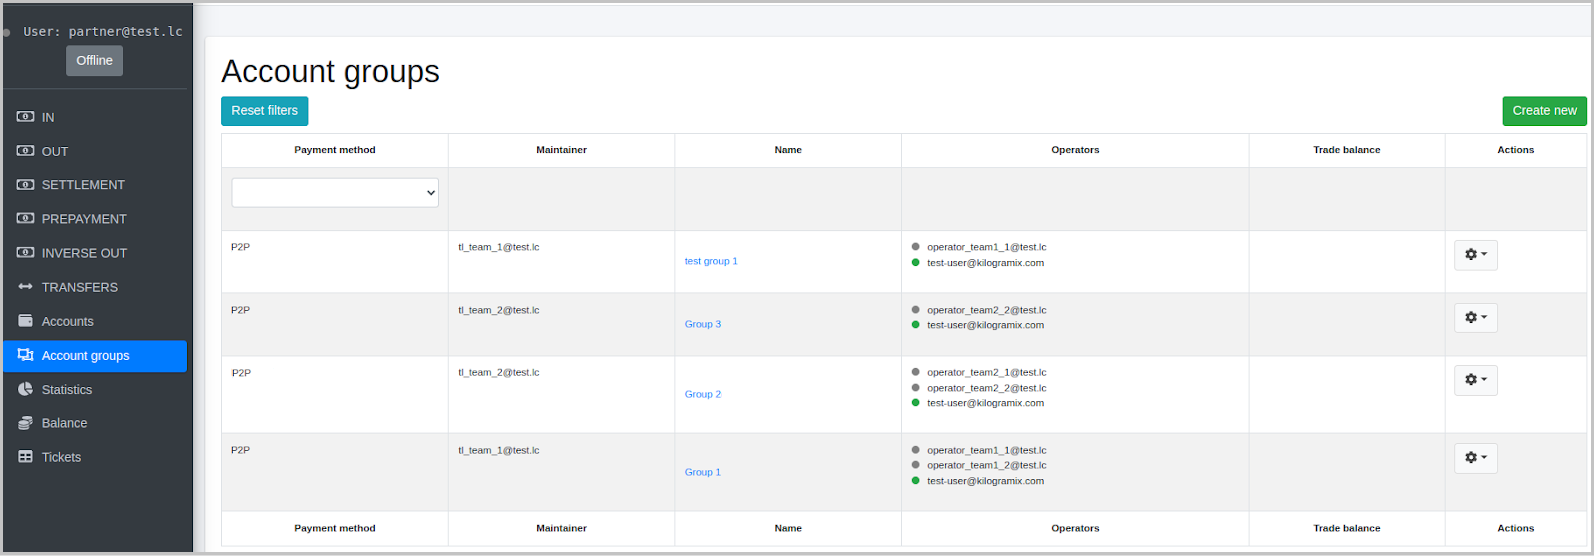
Click Create new.
Fill in the fields in the window that opens.
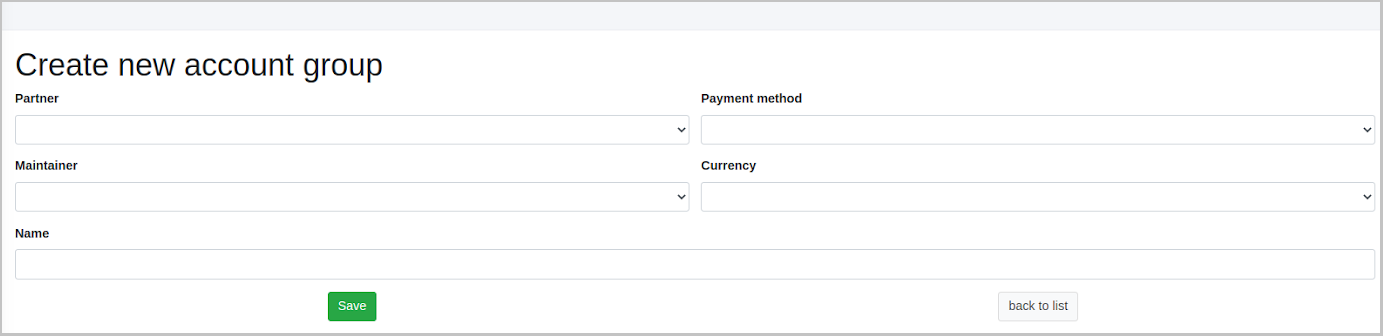
In the Partner field select the available value.
Payment method—select the value prearranged with the key account manager. If necessary, check with the operator.
Maintainer—select the user with the super-operator role. This field is mandatory if the team has a super-operator.
In the Currency field, select the currency to be used in traffic. Usually, traders are required to select local currency.
Example
Mutual settlements are carried out in USDT, but the traffic in your segment is in local currency. Therefore, you are required to select local currency.
Name—enter a user-friendly name. This name is to easily tell one team from another if there are several of them.
After the team is created, the users can see the main sections of the administrative panel according to the assigned roles.
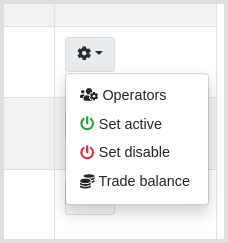
For the group to be able to use the balance, you need to link the active trader balance. To do so, click the gear icon next to the operators group and select Trade balance.
A single trader balance can be linked to several groups.
If no trader balance is linked to the group, the group will not be able to use any balance and process requests.
The following settings can be performed by either the Partner or the super-operator!
Next step is creating accounts. This operation is accessible to the Partner and the super-operator in the Accounts section.
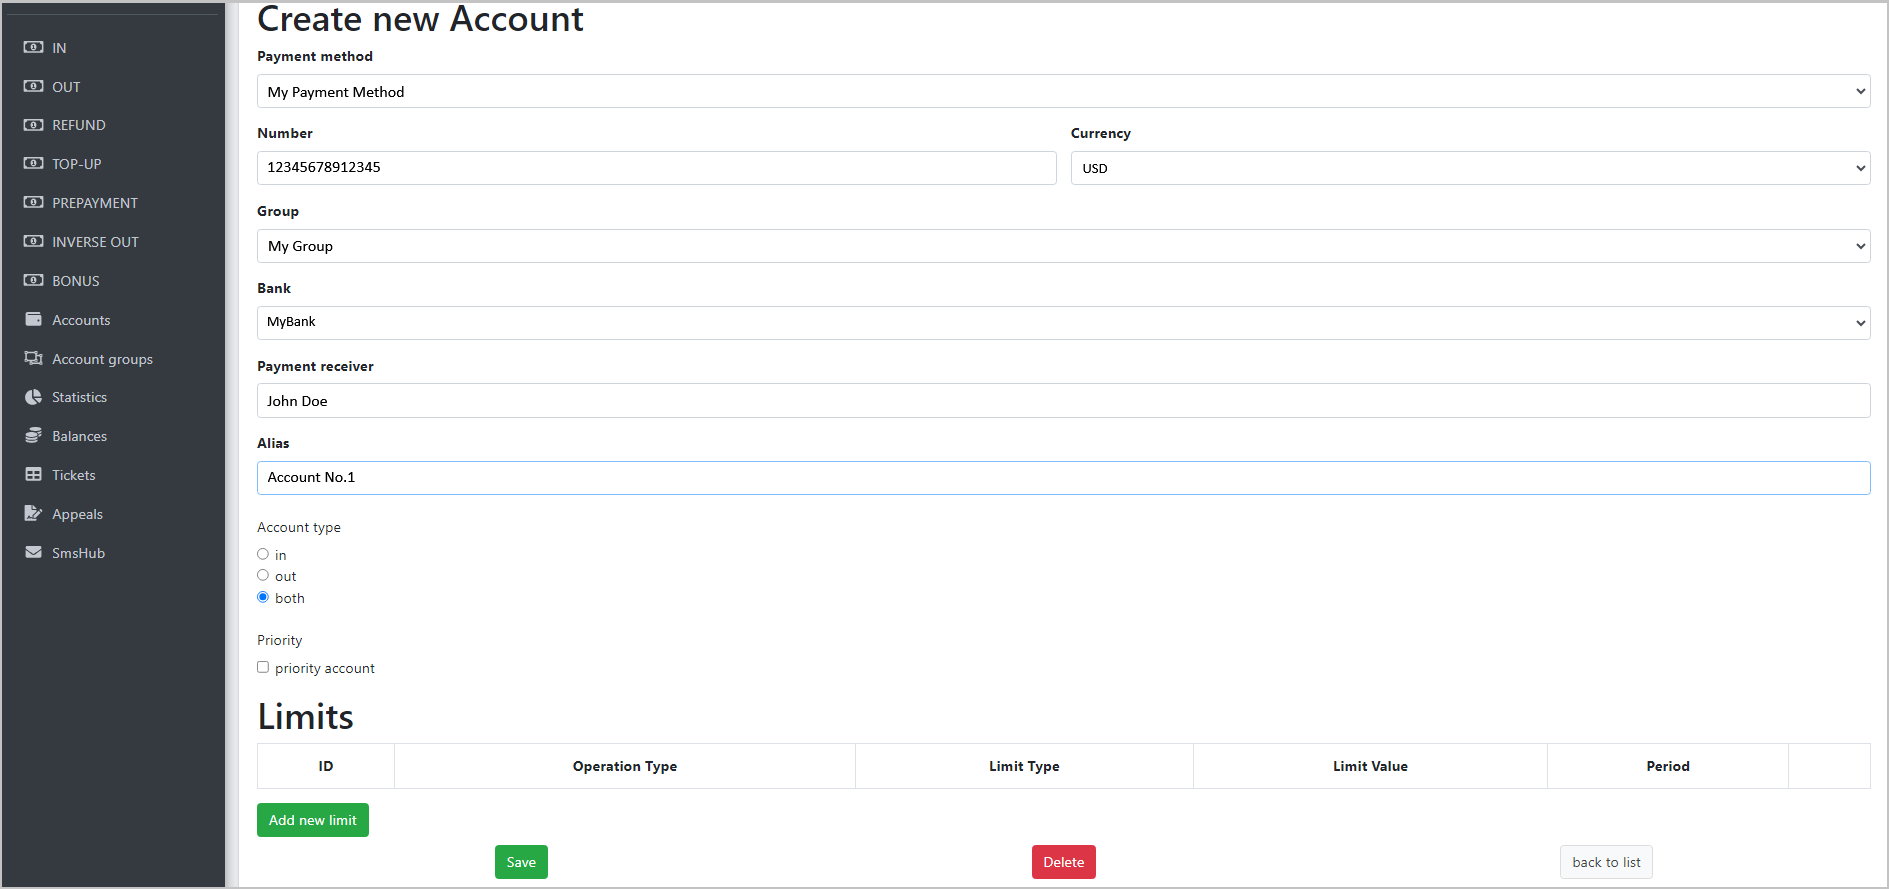
Start account creation by clicking Create new.
How to create a card account
-
Fill in the following boxes
-
Payment method—select the required payment method from the list.
-
Number—enter the destination account number.
-
Group—select the account group from the ones you previously created.
-
Bank—select the bank agreed upon with your manager from the list of available banks.
-
Payment receiver—enter the payment beneficiary name (account owner)
-
Alias—enter an alternative account name if required
-
Account type—select Both if not otherwise recommended by your account manager
-
Priority—leave this box empty!
-
-
Click Save to save the new account.
If you the Card method is not available in the Payment method box, we recommend you to reach out to your key account manager to enable this option.
Once you create, do not move it to Active status manually!
The traffic will go to an account in the Active status regardless of whether someone is Online or not!
Automation setup
Setting up notifications to be automatically linked to requests (operations)
After the mandatory platform setup, you need to set up automatic notification matching. The following explains how to do it.
The app collects notifications from the phone and use them to finalize operations.
The phone must have only one SIM card and the banking app must be linked to the number of that card!
The list of banks is discussed at the initial stage of integration.
Currently, only the Android app is available.
Setting up automatic matching notifications with requests (operations)
After the mandatory platform setup, you need to set up automatic notification matching. The following explains how to do it.
The app collects notifications from the phone and use them to finalize operations.
The phone must have only one SIM card and the banking app must be linked to the number of that card!
The list of banks is discussed at the initial stage of integration.
Currently, only the Android app is available.
The Platform app must be available at all times!
When processing traffic, the phone must not be rebooted to avoid incorrect statuses! The app should always be active and no restrictions must be applied to the app!
Installation and setup of the AlertHub app
To install the AlertHub app on your phone:
-
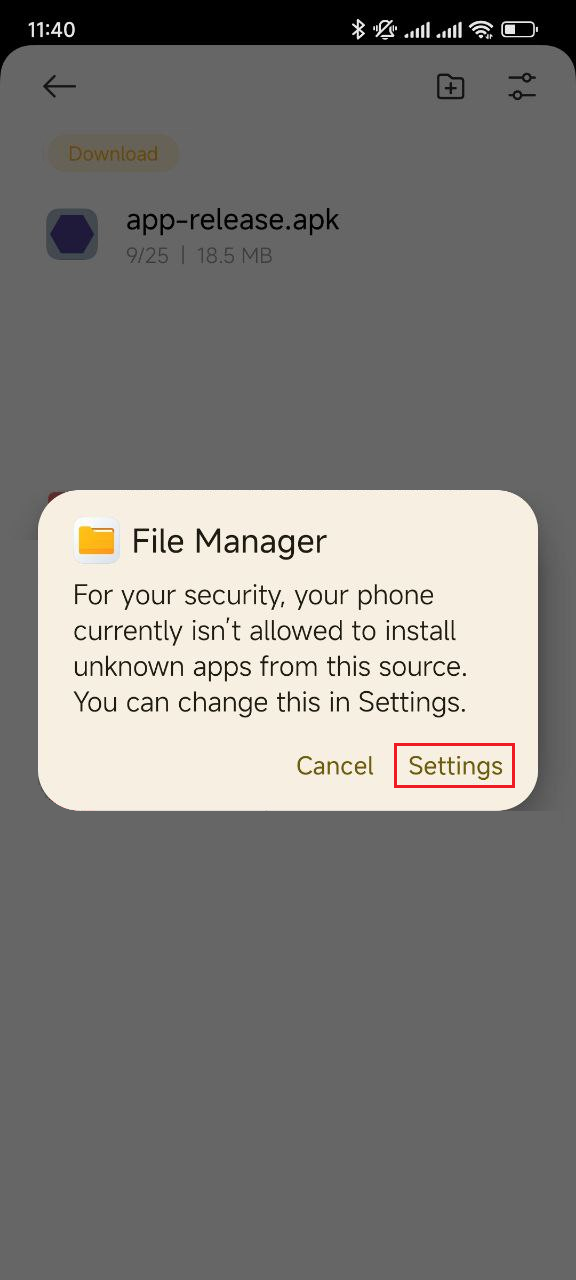
Download the apk installation file of the AlertHub app and run the file. A window will open warning you that installation of unknown apps is blocked.

-
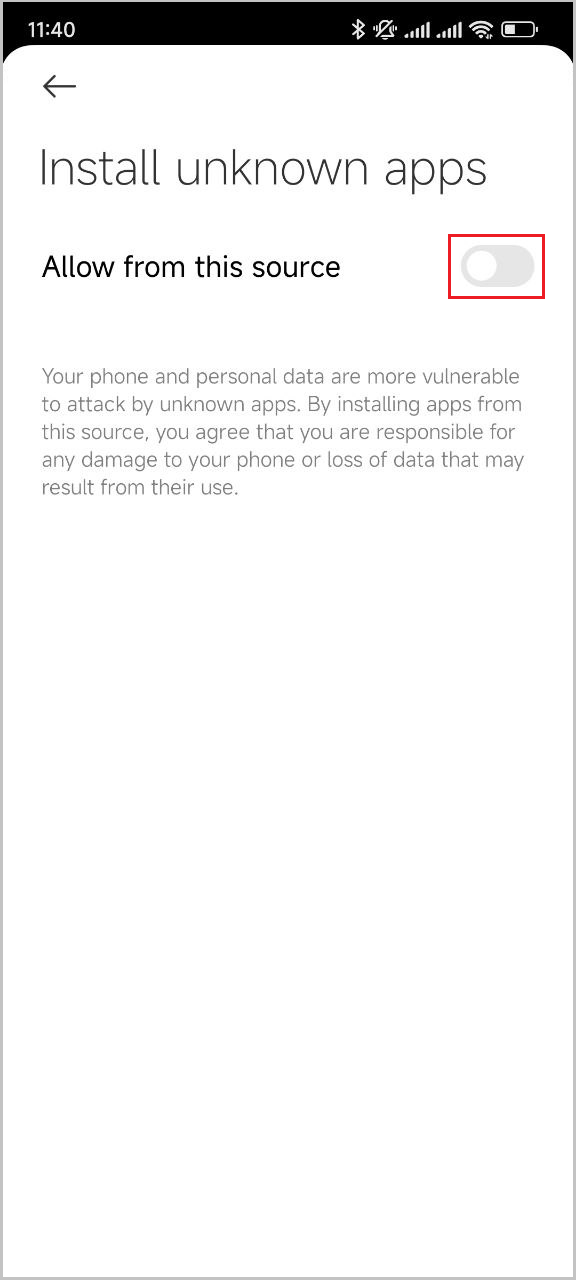
In the next screen, tap Settings, and then in the Install unknown apps screen, tap Allow from this source.
-
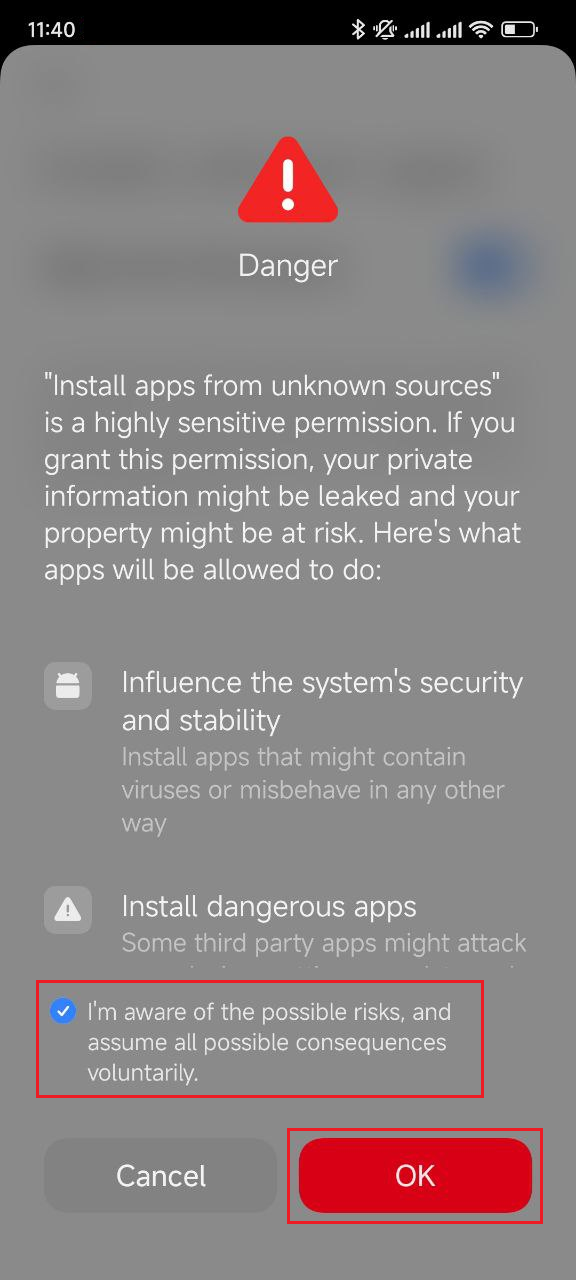
In the next screen, check the I'm aware of the possible risks, and assume all possible consequences voluntarily box, wait for the countdown to finish, tap OK, and then start the app installation process by clicking Install.
-
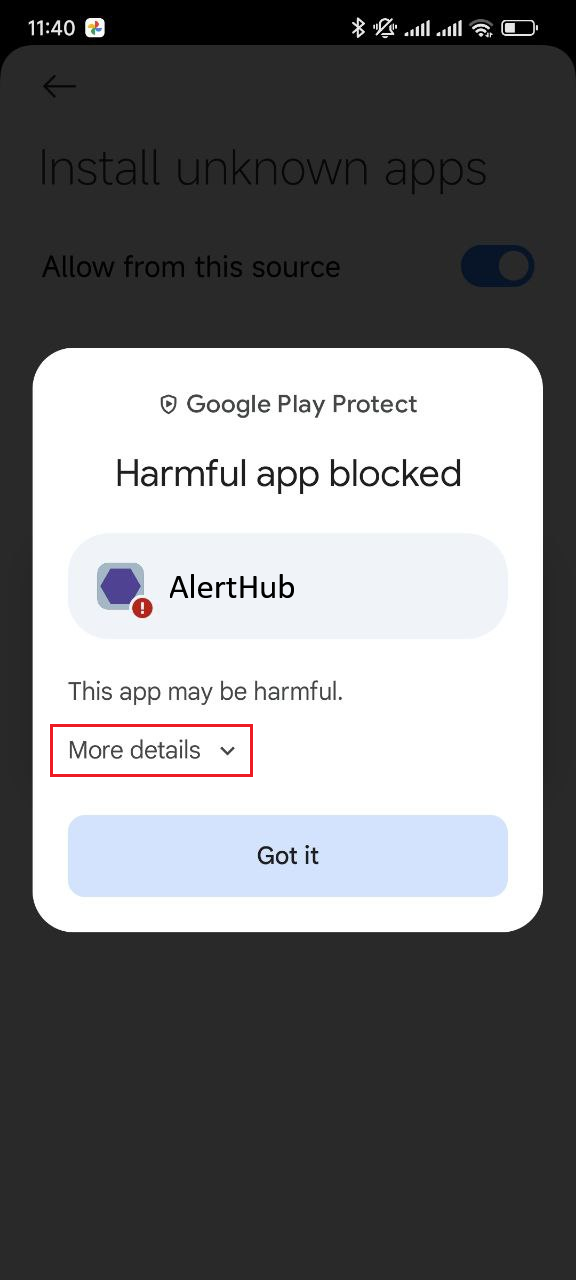
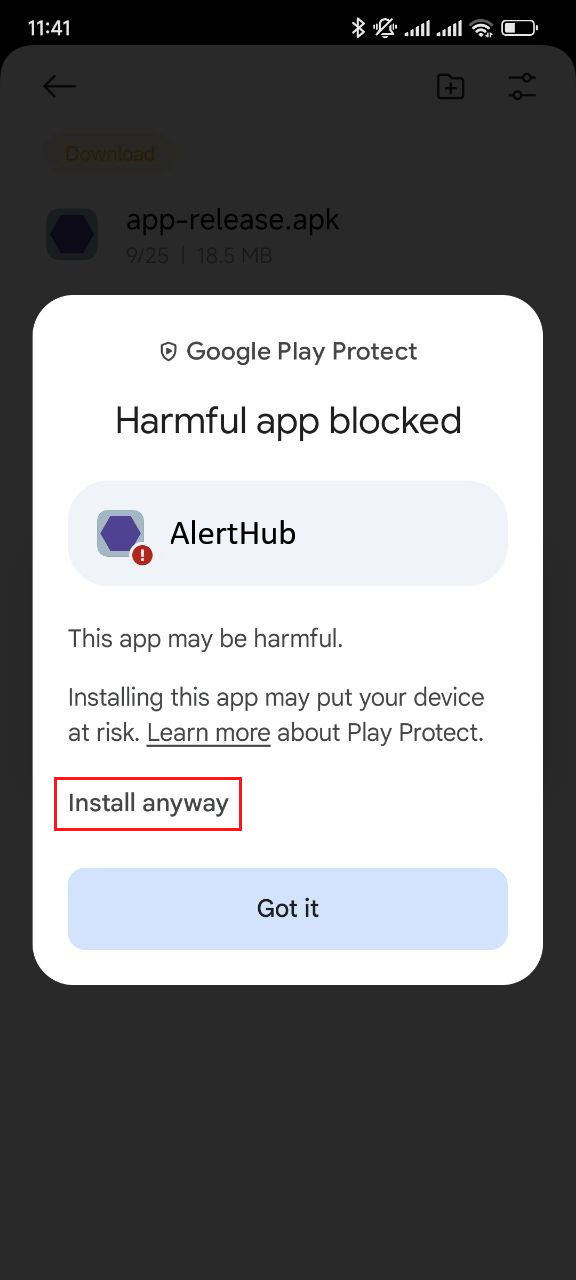
(Complete this step only if Google Play Protect is enabled on your phone!) In the Google Play Protect screen, tap More details, and then — Install anyway. Confirm your consent with PIN or fingerprint.
-
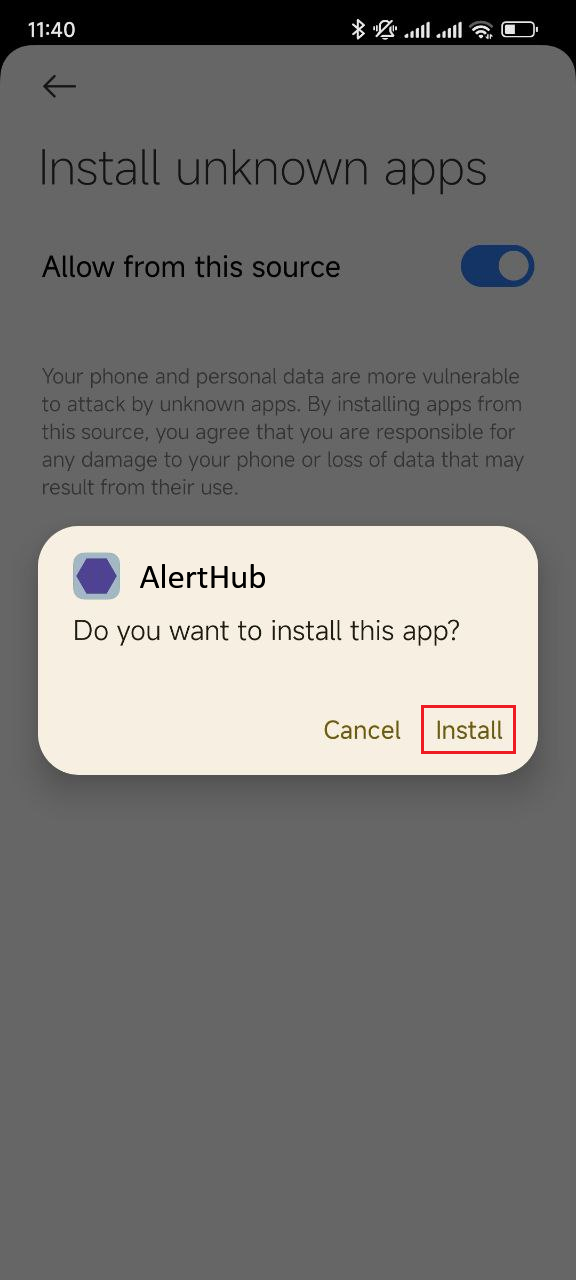
If Google Play Protect is enabled on your phone, tap Install to start installation of the AlertHub app. Otherwise, skip this step.
-
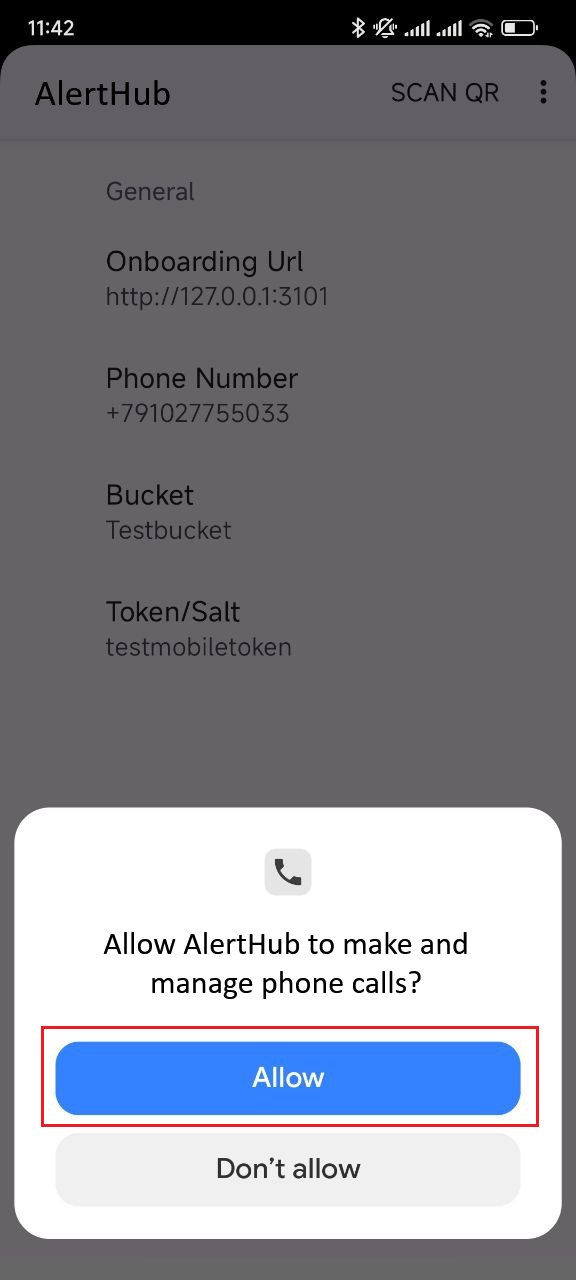
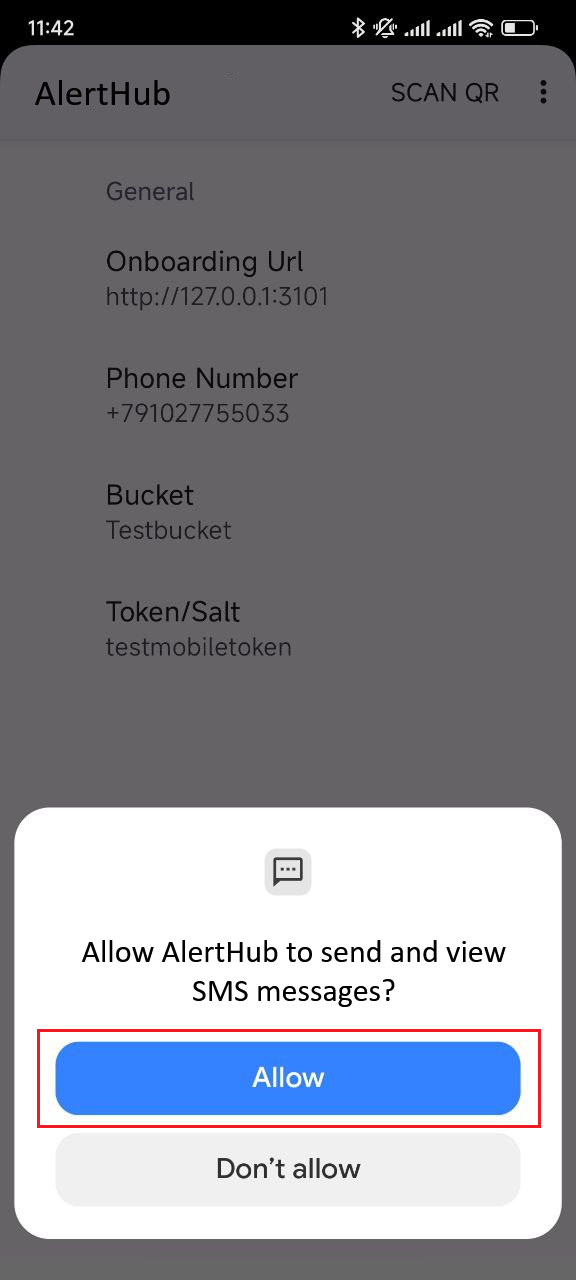
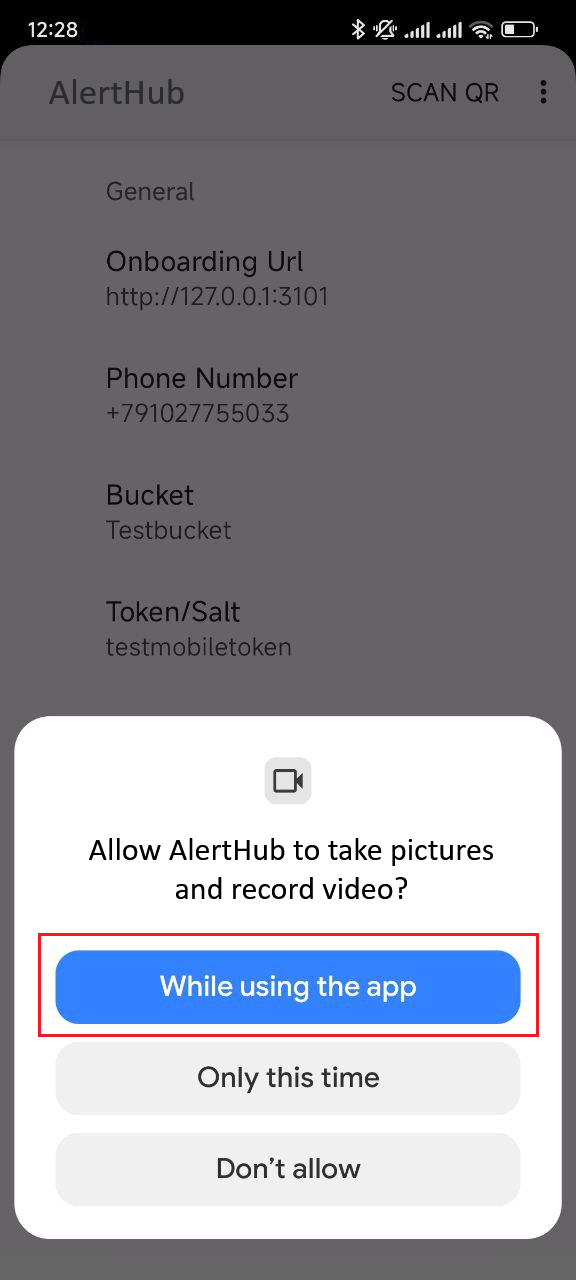
In the screens that follow, tap Allow two times to grant the AlertHub app permissions to make and manage phone calls, as well as to send and view SMS messages.
-
(Only for Android version 12 and below!) Grant the AlertHub app permissions to send notifications:
- Open Settings and select Apps, and then Manage apps.
- Select the AlertHub app.
- Tap Notifications and enable the Show notifications setting.
-
(Only for Android version 13 and higher!) Before granting the AlertHub app permissions to send notifications, you need to allow restricted settings for the app:
- Open Settings.
- Select Apps, and then Manage apps.
- Select the AlertHub app.
- Click the three dots in the upper right corner and select Grant all permissions. A confirmation screen will open where you need to enter a password or confirm with a fingerprint.
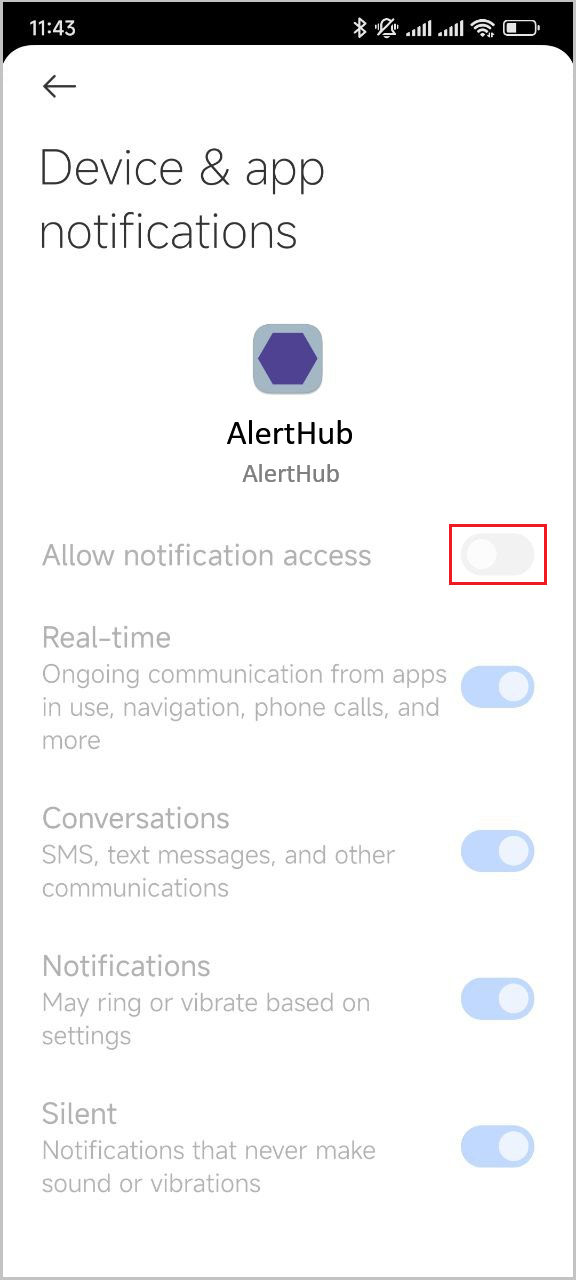
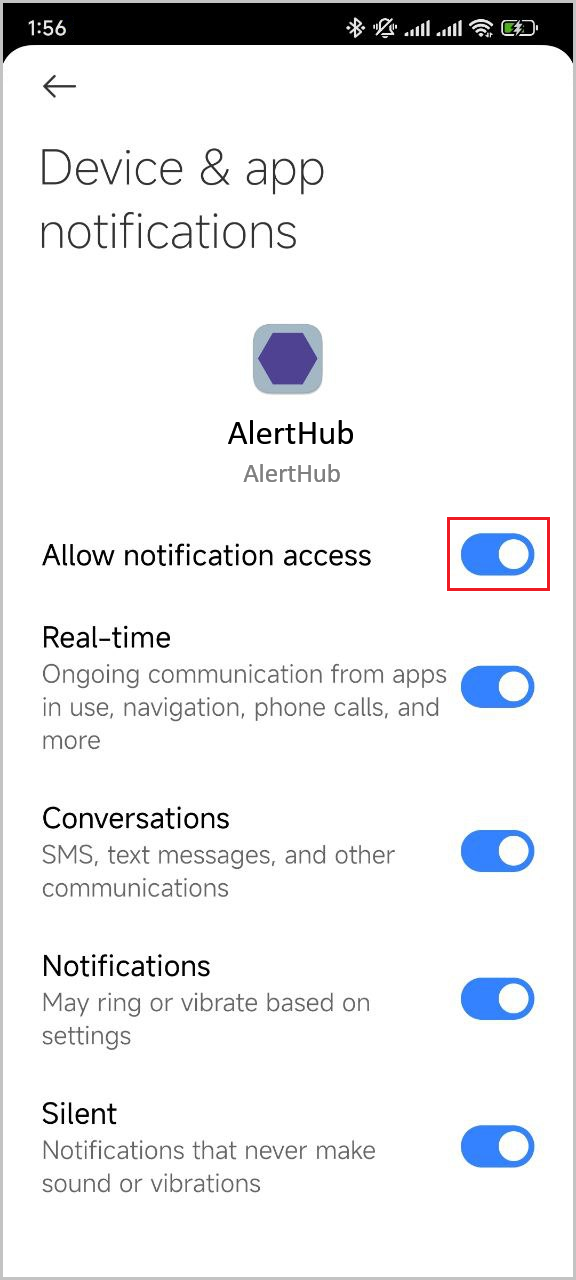
Next, grant the AlertHub app permissions to send notifications:
- Open the AlertHub app.
- Click the three dots in the upper right corner and select Open Notification Settings.
-
Select the AlertHub app and enable the Allow notification access setting.
The AlertHub app installation is complete. Next, you need to add an account in the app.
Account setup in the AlertHub app
Set up your account as follows.
-
In the Accounts section of administrative panel, select the account to add to the AlertHub app and click the corresponding in the Numbers column to open the account details.
-
Open the AlertHub app.
-
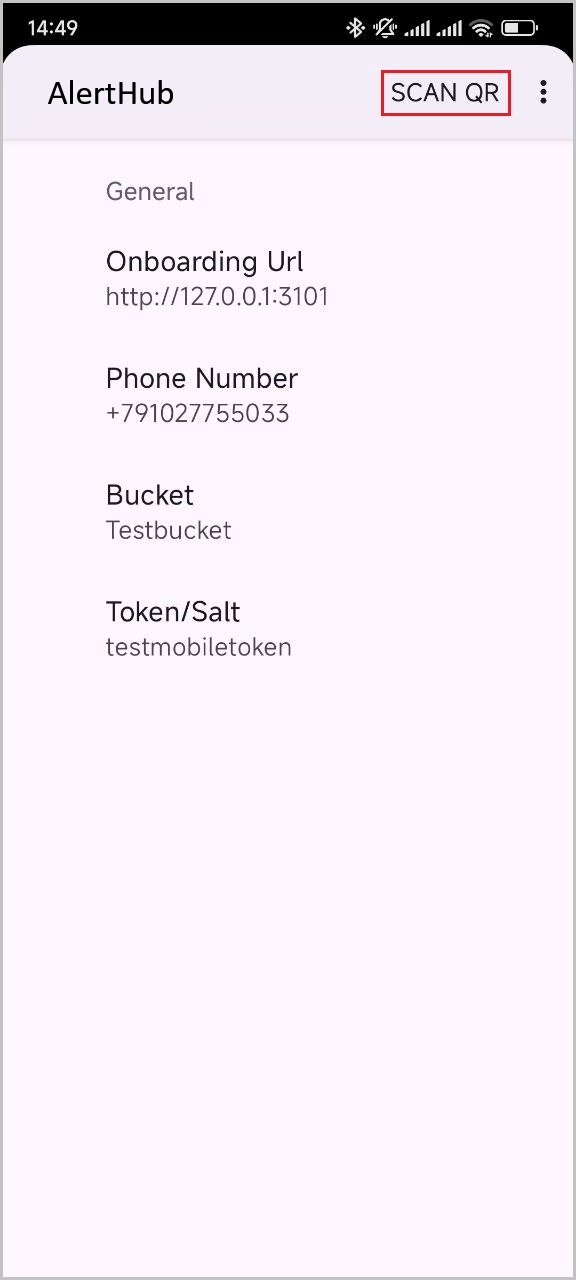
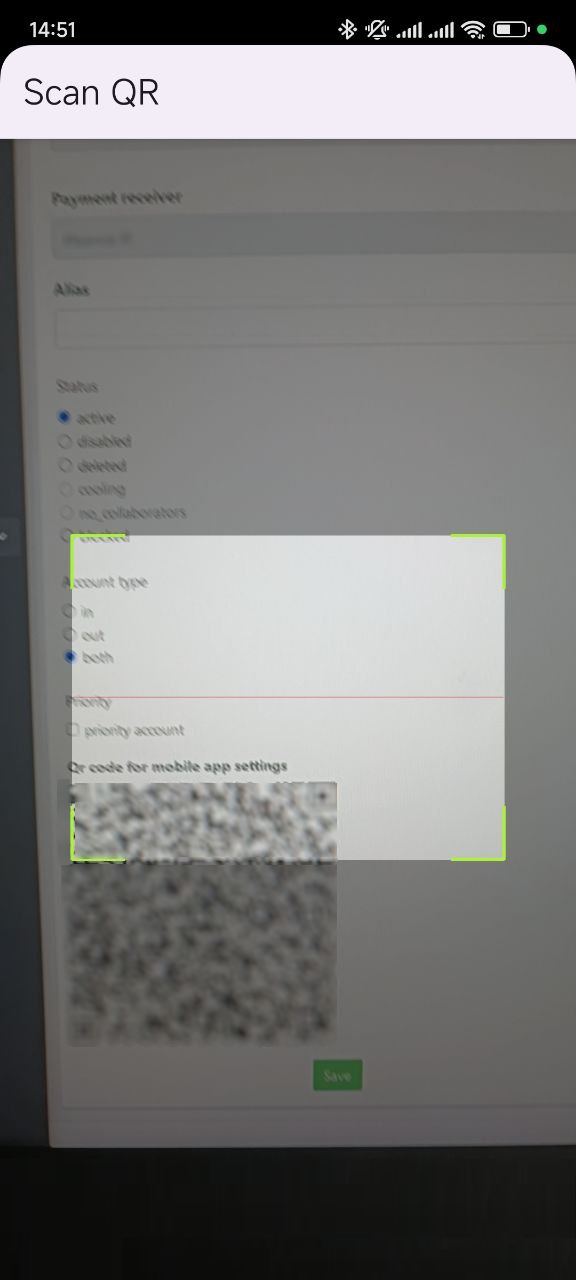
In the AlertHub app, tap Scan QR, and then aim your camera at the QR code on the account details page opened in the administrative panel.
-
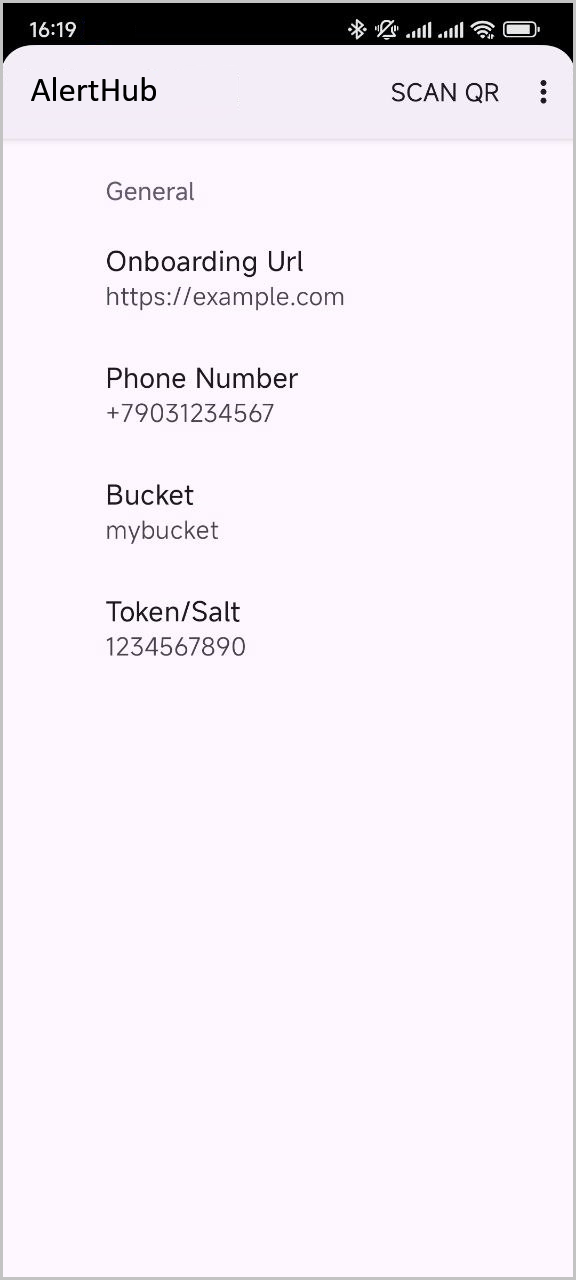
Once the QR code is read and all the account details in the AlertHub app are populated, the app is ready for use.
Account list in personal profile
Click the number to open the number details and its settings with the QR code for the app (see the screenshot).
After the automatic matching is set up, contact the tech support team to check that the matching operates as expected:
- Text the tech support chat with a request to check the matching operation; include the phone (account) number to check.
- Make sure the automatic matching is on and the SMS notifications in the bank app are enabled.
- Make a test transfer to your number.
- Contact the platform's tech support team, make sure the message is received, and check that the information in the message matches. If that information matches your information, the setting is made correctly.
Check sequence:
- Send a test transfer to the phone.
- You will receive an SMS message. (Make sure it is SMS and not any another notification type).
- Check the SMS in the SMSHub section: it must include the "letter" icon and your bank as the sender.
- The tech support team also confirms the availability and correctness of the message. Then report the account ID to the chat (exactly as it is registered with the system!).
Always test automatic matching!
FOR EACH NEW ACCOUNT THAT IS CREATED IN THE SYSTEM, REGARDLESS OF HOW LONG YOU USE PLATFORM, MAKE TEST TRANSFERS AND CHECK THAT AUTOMATIC MATCHING WORKS CORRECTLY!
The final step is the top up of the Partner balance and redistribution of the balance to Trader balance and traffic start when the operator(s) go online.
FAQ
Which balance currency to choose—USDT or local currency?
At the initial integration step, the Partner can choose the balance currency—USDT or local currency.
If you choose local currency, the conversion of USDT to local currency will be made at the moment when the balance is topped up.
If you choose USDT, the conversion will be made on per transaction basis. In other words, each time a transaction is completed. The rate is updated every minute.
How soon are access credentials issued?
Access credentials are usually issued within 24 hours. Small delay is possible on weekends and holidays.
What number of requests per account is allowed?
You can increase the number of incoming requests per single account if you are sure you can handle the increased load. To do so, text the tech support chat. We recommend that you start with 1-2 requests per account and gradually increase the load to 3-4.
What is the maximum number of payout requests?
The number of payout requests that can be received simultaneously on Partner account should be increased gradually. We recommend that you start with 2-3 requests per account and gradually increase the load by contacting the Main chat.
What is the minimum request amount for in-payment?
The minimum transaction amount for in-payment depends on the payment method you use. For more information, contact the Main chat.